There are several ways how to backup and restore SQL databases. Over time, the way I back up and restore databases has changed.
Originally my backup database code looked like this:
The problem is that you needed to have SQL Server Management Studio (SSMS) installed for the code to run correctly. Having SSMS installed on a production server is not the best of ideas, so luckily PowerShell gives us the ability to backup all user databases very easily:
Now that we have our databases backed up, let's take a look at the old way that I use to restore databases:
Below is the newer, strictly using PowerShell way that I use to restore the just backed up databases:
Hopefully this will give you a couple of good solutions for backing up and restoring your SQL Server Databases through PowerShell.
-PC
Showing posts with label SQL. Show all posts
Showing posts with label SQL. Show all posts
Thursday, January 28, 2016
Wednesday, December 30, 2015
Moving User SQL Databases Using PowerShell
I grew tired of manually moving databases around using a combination of SQL and "Copy / Paste" so wrote out a bit of PowerShell to save me some time and effort.
Notice that I am using the copy-item then deleting the object, not just moving the item. This is because of how permissions on objects are handled with copy vs move, plus I am paranoid about not having my original database handy if the move fails, or the moved database gets corrupted in transit.
The next step is to get the database information:
Once we have the database information, the database will need to be taken OFFLINE: Once the database is offline, we can copy the file, set ACLs, and update the database with the new .mdf and .ldf file locations: Then we can bring the DB back ONLINE Once the DB is back ONLINE, wait for 10 seconds and delete the original database: Here is a look at the code once it is all put together:
Updates
01/01/2016: Fixed issues with ACL for moved files by converting file location to UTC based path format.
01/02/2016: Updated to include snippets and comments
01/05/2016: Major update to fix $destination to UTC path, added copyItem function, item extension switch, updated outputs with write-output and write-verbose.
Notice that I am using the copy-item then deleting the object, not just moving the item. This is because of how permissions on objects are handled with copy vs move, plus I am paranoid about not having my original database handy if the move fails, or the moved database gets corrupted in transit.
Let's take a look at the code
In the first section we will be setting the variables.The next step is to get the database information:
Once we have the database information, the database will need to be taken OFFLINE: Once the database is offline, we can copy the file, set ACLs, and update the database with the new .mdf and .ldf file locations: Then we can bring the DB back ONLINE Once the DB is back ONLINE, wait for 10 seconds and delete the original database: Here is a look at the code once it is all put together:
Updates
01/01/2016: Fixed issues with ACL for moved files by converting file location to UTC based path format.
01/02/2016: Updated to include snippets and comments
01/05/2016: Major update to fix $destination to UTC path, added copyItem function, item extension switch, updated outputs with write-output and write-verbose.
Thursday, July 2, 2015
Provisioning SQL Server Always-On Without Rights
Separation of roles, duties, and responsibilities in a larger corporate/government environment is a good thing. It is a good thing unless you are actually trying to get something accomplished quickly on your own. But this is why there is a separation of roles, so that one person cannot simply go and add objects into Active Directory on a whim, or play with the F5 because they watched a video on YouTube.
I recently had designed a solution that was going to take advantage of SQL Server 2012 High Availability and Disaster Recovery Always-On Group Listeners. The problem was that I was not a domain admin, and did not have rights to create a computer object for the Server OS Windows Cluster, or the SQL Group Listener.
Creating the OS Cluster
Creating the OS Cluster was the easy part, I just needed to find an administrator that had the rights to create a computer object in the domain. Once that was accomplished, I made sure that the user had local admin rights on all of the soon-to-be clustered machines, and had them run the following script:
$node1 = "Node-01.contoso.local"
$node2 = "Node-02.contoso.local"
$osClusternName = "THESPSQLCLUSTER"
$osClusterIP = "192.168.1.11"
# $ignoreAddress = "172.20.0.0/21"
$nodes = ($node1, $node2)
Import-Module FailoverClusters
function testCluster {
    # Test Cluster
    $test = Test-Cluster -Node (foreach{$nodes})
    $testPath = $env:HOMEPATH + "\AppData\Local\Temp\" + $test.Name.ToString()
    # View Report
    $IE=new-object -com internetexplorer.application
    $IE.navigate2($testPath)
    $IE.visible=$true
}
function buildCluster {
    # Build Cluster
    $new = New-Cluster -Name $osClusternName -Node (foreach{$nodes}) -StaticAddress $osClusterIP -NoStorage # -IgnoreNetwork $ignoreAddress
    Get-Cluster | Select *
    # View Report
    $newPath = "C:\Windows\cluster\Reports\" + $new.Name.ToString()
    $IE=new-object -com internetexplorer.application
    $IE.navigate2($newPath)
    $IE.visible=$true
}
# un-comment what you what to do...
# testCluster
buildCluster
Creating the Group Listener
Creating the Group Listener was a bit more challenging, but not too bad. Once the OS Cluster computer object was created (thespsqlcluster.contoso.local), the newly created computer object needed to be given rights as well.
- The cluster identity 'thespsqlcluster' needs Create Computer Objects permissions. By default all computer objects are created in the same container as the cluster identity 'thespsqlcluster'.
- If there is an existing computer object, verify the Cluster Identity 'thespsqlcluster' has 'Full Control' permission to that computer object using the Active Directory Users and Computers tool.
You will also want to make sure that the quota for computer objects for 'thespsqlcluster' has not been reached.
The domain administrator was also given Sysadmin rights to all of the SQL Server instances in the cluster.
After all the permissions were set, the Domain admin could run the following script on the Primary SQL Instance to create the Group Listener:
Import-Module ServerManager -EA 0
Import-Module SQLPS -DisableNameChecking -EA 0
$listenerName = "LSN-TheSPDatabases"
$server = $env:COMPUTERNAME
$path = "SQLSERVER:\sql\$server\default\availabilitygroups\"
$groups = Get-ChildItem -Path $path
$groupPath = $path + $groups[0].Name
$groupPath
New-SqlAvailabilityGroupListener `
    -Name $listenerName `
    -StaticIp "192.168.1.12/255.255.255.0" `
    -Port "1433" `
    -Path $groupPath
Important
After the group listener is created, all the rights that were put in place can once again be removed with the understanding that if you wish to add another listener at another time, the permissions will have to be reinstated temporarily once again. In my case, once all of the computer objects were created successfully, all rights were removed off the cluster computer object and the domain administrator was removed from SQL.Updates
07/06/2015 Cleaned up diction and grammar, added the Important section.
10/21/2015 Updated computer object permission requirements
10/21/2015 Updated computer object permission requirements
Wednesday, January 1, 2014
Run a PowerShell v3 Script From a SQL Server Agent Job
In a previous blog post, Synchronize Active Directory With SQL pt II, I mention creating a Scheduled Task to run the PowerShell script to keep AD synchronized to SQL. Then a colleague of mine, Don Kirkham (@DonKirkham) asked if it was possible to run a PowerShell script from within SQL. Well Don, the answer is "Yes", but there is a caveat... While SQL Server 2012 is running on Windows Server 2012, PowerShell for SQL is at version 2 and Windows Server 2012 is running PowerShell v3. We will address this issue later in the blog.
The other issue to be aware of is the warning from Microsoft, which says, "Each SQL Server Agent job step that runs PowerShell with the sqlps module launches a process which consumes approximately 20 MB of memory. Running large numbers of concurrent Windows PowerShell job steps can adversely impact performance." So be careful not to choke your server.


Objective
Create a SQL Server Agent Job that runs a PowerShell script at a specific time and interval. In other words, a SQL job that mirrors the Scheduled Task created in my other blog post on how to Create a Scheduled Task With PowerShell.
PowerShell- SQL v2 vs Server v3
As was just mentioned, PowerShell within SQL runs Version 2. If you were unaware that you could run PowerShell from within SQL Server Management Studio (SSMS), right-click on a folder, and select "Start PowerShell". Microsoft was nice enough to not make the option available for every folder, so for this blog, we are going to use the Jobs folder.

This opens up a SQL Server PowerShell window and if you type:
$PSVersionTable
you will see that SQL 2012 PowerShell is running V2.

Here is where the problem begins. When you try to run the Sync AD to SQL script, it will error out, because the ActiveDirectory module is for PowerShell version 3, and when you try to import the module into version 2, your window will fill with RED.

Instead of hacking things up and having different versions of the Sync AD to SQL script, we are simply going to try to open a PowerShell v3 window and execute the script within the new window. The first thing we want to try is to actually see if we can open a new instance of a PowerShell v3 window from within out SQL v2 window. So within the SQL Server PowerShell window type:
Start-Process PowerShell
and in the new window, type:
$PSVersionTable

So now, all we need to do is tweak the script a bit to run the Sync AD to SQL script when the new v3 PowerShell window opens. The script that will be run is:
Start-Process PowerShell -ArgumentList "& 'C:\Scripts\SQL\Sync AD to SQL.ps1'"
Notice the single quotes around the location of the file that we are going to run.
Create The Accounts
Now that we have the proper syntax to get our v3 script run from within SQL, it is time to create the Job.
The nice thing about using PowerShell to create a Scheduled Task is the ease to create the RunAs account for the Scheduled Task. Within SQL, there are a couple of hoops that you will need to jump through to create the RunAs account for the Job.
The first thing that will need to be accomplished is to create a Credential to use as the RunAs account. Under the Security folder, right-click Credentials, and select New Credential...

Within the New Credential window, fill out the boxes appropriately:

or you can run a SQL Query to create it:
USE [master]
GO
CREATE CREDENTIAL [pcDemo\spAdmin] WITH IDENTITY = N'PCDEMO\spAdmin', SECRET = N'YourPassword'
GO
Next, we have to create a Proxy for the account to run a specific service. For this Job, we want the spAdmin account to run PowerShell, so we need to add that account as a Proxy. To accomplish this task, expand SQL Server Agent --> Proxies and right-click the PowerShell folder and select New Proxy...

Within the New Proxy Account window, fill out the boxes appropriately:

Or run a SQL Query to create the proxy:
USE [msdb]
GO
EXEC msdb.dbo.sp_add_proxy @proxy_name=N'PS spAdmin Proxy',@credential_name=N'pcDemo\spAdmin',@enabled=1
GO
EXEC msdb.dbo.sp_grant_proxy_to_subsystem @proxy_name=N'PS spAdmin Proxy', @subsystem_id=12
GO
Now that we have the Credential and the Proxy accounts created, the Job can be created.
Create The Job
From within SSMS connect to the SQL Server that is going to be running the Agent Job, and expand the object explorer to show the Jobs folder.

Right-click the Jobs folder and select: New Job...

This will open up the New Job window. Under the General page, you will want to give the Job a friendly name, and make sure that your Job is Enabled.

From within the Steps page, we will create our one and only step for this post, which will be to execute the Sync AD to SQL.ps1 files in a new PowerShell v3 window using the spAdmin Account.
At the bottom of the window click the New... button, which will open up yet another window, the New Job Window.
- Step name: Something user friendly and descriptive
- Type: PowerShell
- Run as: Select the proxy account you created earlier.
- Command:
Start-Process PowerShell -ArgumentList "& 'C:\Scripts\SQL\Sync AD to SQL.ps1'"

Click OK when finished
The Steps page should now look like this:

Next, click on the Schedules page, and click the New... button at the bottom of the Schedule List. This will open up a New Job Schedule window.
- Name: Add a user friendly name, such as Daily 2:00am Job
- Frequency: Change to Daily
- Daily Frequency
- Occurs once at: 2:00am
- Click OK when finished

Click OK for the new job when finished. You can also run the following SQL query to create the same Job:
USE [msdb]
GO
DECLARE @jobId BINARY(16)
EXEC msdb.dbo.sp_add_job @job_name=N'Sync AD to SQL Job',
     @enabled=1,
     @notify_level_eventlog=0,
     @notify_level_email=2,
     @notify_level_netsend=2,
     @notify_level_page=2,
     @delete_level=0,
     @category_name=N'[Uncategorized (Local)]',
     @owner_login_name=N'PCDEMO\spAdmin', @job_id = @jobId OUTPUT
select @jobId
GO
EXEC msdb.dbo.sp_add_jobserver @job_name=N'Sync AD to SQL Job', @server_name = N'SQL2012-03'
GO
USE [msdb]
GO
EXEC msdb.dbo.sp_add_jobstep @job_name=N'Sync AD to SQL Job', @step_name=N'Run Sync AD to SQL PowerShell Script',
     @step_id=1,
     @cmdexec_success_code=0,
     @on_success_action=1,
     @on_fail_action=2,
     @retry_attempts=0,
     @retry_interval=0,
     @os_run_priority=0, @subsystem=N'PowerShell',
     @command=N'Start-Process PowerShell -ArgumentList "& ''C:\Scripts\SQL\Sync AD to SQL.ps1''"',
     @database_name=N'master',
     @flags=0,
     @proxy_name=N'PS spAdmin Proxy'
GO
USE [msdb]
GO
EXEC msdb.dbo.sp_update_job @job_name=N'Sync AD to SQL Job',
     @enabled=1,
     @start_step_id=1,
     @notify_level_eventlog=0,
     @notify_level_email=2,
     @notify_level_netsend=2,
     @notify_level_page=2,
     @delete_level=0,
     @description=N'',
     @category_name=N'[Uncategorized (Local)]',
     @owner_login_name=N'PCDEMO\spAdmin',
     @notify_email_operator_name=N'',
     @notify_netsend_operator_name=N'',
     @notify_page_operator_name=N''
GO
USE [msdb]
GO
DECLARE @schedule_id int
EXEC msdb.dbo.sp_add_jobschedule @job_name=N'Sync AD to SQL Job', @name=N'Daily 2:00am Job',
     @enabled=1,
     @freq_type=4,
     @freq_interval=1,
     @freq_subday_type=1,
     @freq_subday_interval=0,
     @freq_relative_interval=0,
     @freq_recurrence_factor=1,
     @active_start_date=20140101,
     @active_end_date=99991231,
     @active_start_time=20000,
     @active_end_time=235959, @schedule_id = @schedule_id OUTPUT
select @schedule_id
GO
Testing
After Refreshing the Object Explorer, you should now see the Sync AD to SQL Job in the Jobs folder. Right-click the job and select Start Job at Step...

Since there is only one step associated with the Job, so a new window will popup and your Job will start right away. Hopefully you will see a window that looks like this:

If not, SQL have a very nice way to view the history of the Job. If you right-click the Job name, and select View History, the Log File Viewer window will popup with the Job History for the appropriate Job already selected. If you expand the failed job, you will receive insight into why your Job as failed:

Conclusion
You should now be able to create a SQL Server Agent Job instead of a Scheduled Task to run a PowerShell script. Thank you again Don for the blog idea.
Wednesday, November 27, 2013
Synchronize Active Directory With SQL pt II
One of the big complaints about querying Active Directory from within SQL is the lack of ability to easily return more that 1,000 items. In this post, we are going to solve that dilemma by throwing in some PowerShell to get around the Page Size limit. In this blog, I will demonstrate how to take 28,000+ users from Active Directory, put them into a SQL Table, and update the Production SQL Table. I will also go through some of the lessons learned from this experience, because it was not as easy as I had originally had hoped. Why synchronize AD to SQL? From a user manageability perspective, I think this is a great way to allow users to maintain their own information, such as their Address and Phone Numbers, or any corporate information without bothering HR or the IT staff to update AD profiles.
Objective
The objective of this post is to take all users from Active Directory, along with their lastLogon times, and synchronize them into a SQL table. This is going to be accomplished through the use of PowerShell and SQL.
Requirements
I have created this in PowerShell ISE version 3.0 on Windows Server 2012 and SQL Server 2012. The person running the script should have permissions to create and write into SQL, and read items from AD. You will need to have the SQLPS module and the ActiveDirectory modules installed. The SQL module should be installed when you install SSMS, and you can add the ActiveDirectory module by activating the feature through the Add Roles and Features Wizard:
 You should also have a database and a table in place to save all of your Production User Data. I created a database name "pcDemo_Personnel" and this is the table that I will use for this post:
Do not take querying your servers lightly. You should talk to your AD team BEFORE querying your domain controllers, and see if they have a preferred server that they wish you to query and/or specific times that they wish you to run your queries. Obviously, if they do not want you to query each server, then you will not be able to get accurate lastLogon times. Also, this information could be important to them as a health check of their servers.
Now that you have your User Information, we will be manipulating the information and passing it into SQL.
Putting User Information into SQL (Attempt #1)
As in the previous post, I started by creating a table in SQL called Temp_ADUsers. Since we are now able to write a SQL query within PowerShell to insert information into SQL, I figured I would just loop through each individual user and insert them and their information into my table. Then I would query the second OU and update the table with each user's lastLogon time, and then the final server.
The SQL query looked like this (we will talk about the setLastLogon Function shortly):
 This method of running the insert and update SQL queries also brought up another issue:
 Because there are people in Active Directory with single apostrophes in their name like Mr. O'Connor, I would have to come up with a work around for any property value that has an apostrophe in it. Luckily, the time to completion is so horrible that I figured solving for an apostrophe should be pretty simple and will address this issue at a later date.
If you recall, another issue with dealing with the lastLogin property is that the lastLogon time is "number of 100 nanosecond intervals since January 1, 1601 (UTC)" To solve this issue, I created a function with a foreach to take care of cleaning up the lastLogon time and converting it to a dateTime in UTC (Zulu):
The short lived Attempt #2 was based off a multiple item insert so that I could get rid of the foreach loop. It was a short lived idea because you can only bulk insert up to 1,000 items into SQL. Then I started looking into SQL's Bulk Insert Query, which led me to a question posed in StackOverflow, which led me to the Hey, Scripting Guy! Blog titled Use PowerShell to Collect Server Data and Write to SQL. After reading both articles, it became evident to me that every Server or Network Administrator now has the ability to take Enterprise Information and dump it into SQL. In my opinion, THIS IS HUGE!!! Thank you again Chad Miller (@cmille19) for creating and sharing your SQL Functions!
Putting User Information into SQL (Attempt #3)
After reading through both blog posts mentioned above, I had an understanding of what needed to be done. I added the new functions to my script and commented out the foreach lastLogon cleanup loop to pass just raw data into the DataTable and into SQL. I gave it a run, and ran into an issue:
 Taking a look at the errors, the columns not belonging in the table are found in the returned properties of the Get-ADUser cmdlet. The current query looks like this:
 I un-commented out the foreach lastLogon cleanup loop and tried again. Things seemed to be running, so off I went for coffee, and when I returned, the script had run its course... cleanly. SQL looked like this:
 Now it did not take me 3 hours to drink my coffee, so lets look at the actual run time:
 Holy COW look at those numbers! This process saved 3 hours, 4 minutes, and 18 seconds!
Now that we are able to load User data into SQL, it is time to put the rest of the script together, like Drop the Temp Tables, Set the Get-ADUser -Filter, and move the data from the Temp Tables into the Master AD Users Table.
Dropping Existing SQL Tables
Because the functions that create the SQL data tables do not automatically check to see if the tables exist before creation, it is necessary to delete existing tables so that we can import the data from AD.
There are accounts within AD that you probably do not want to surface, synchronize, and expose their properties, such as the Administrator account, Service accounts, and the krbtgt account. The quickest way is to use the Filter parameter. Typically these accounts do not have displayNames, so filtering out empty values should return People. This may not be true for your organization, however, your organization should have some sort of governance over the naming structure of service accounts. My Get-ADUser cmd looks like this:
Since I had to put a zero in for null values for the lastLogon time, it is necessary to clean up the table. Luckily it is pretty easy to set all 0 values back to null.
Now that all data from all Domain Controllers has been returned, and placed into Temporary SQL tables, we can update the users' information in the Production Table:
After updating current users, it it time to insert new users into the production table. I run the Update query first to save time, granted only by the number of new users to be inserted, but time is time. This is how I add any new users into the Production Table:
For each Domain Controller, we are going to create a column in a new table called temp_lastLogonTimes to store the lastLogon times for each user, then we update the columns with that information:
Like before, we will take our datatable, create a final temp table in SQL, and move the data to the production table.
 And if we take a look at the single DC query:
 So based off the data above, there is a run time average of approximately 1.75 minutes per DC queried when dealing with 28782 users.
You can download the complete code from GitHub:
Create The Timer Job
Now that we can synchronize all users from AD into SQL, we need to create a scheduled task to run our PowerShell script to keep SQL synchronized on a regular basis. Now, this can be run daily or every couple of hours pending on how your organization works.
Please review my post on Creating a Scheduled Task With PowerShell.
However, what if the server Admin will not allow you to create a timer job using the Task Scheduler? Luckily, a colleague of mine, Don Kirham (@DonKirkham) posed a similar question on our company's Yammer site. Don wanted to know if it was possible to use SQL Server Agent jobs to run the job instead. The answer is, yes you can, but it is not as straight forward as one would like. You can read how to run this the Sync AD to SQL script from a SQL Server Agent Job from my blog post called Run a PowerShell v3 Script From a SQL Server Agent Job
UPDATES:
11/29/2013 Added link to Creating a Scheduled Task Blog, and added more kudos to Chad Miller for his contribution of the SQL Functions.
01/01/2014 Added link to blog post: Run a PowerShell v3 Script From a SQL Server Agent Job
Objective
The objective of this post is to take all users from Active Directory, along with their lastLogon times, and synchronize them into a SQL table. This is going to be accomplished through the use of PowerShell and SQL.
Requirements
I have created this in PowerShell ISE version 3.0 on Windows Server 2012 and SQL Server 2012. The person running the script should have permissions to create and write into SQL, and read items from AD. You will need to have the SQLPS module and the ActiveDirectory modules installed. The SQL module should be installed when you install SSMS, and you can add the ActiveDirectory module by activating the feature through the Add Roles and Features Wizard:

USE [pcDemo_Personnel]
GO
SET ANSI_NULLS ON
GO
SET QUOTED_IDENTIFIER ON
GO
SET ANSI_PADDING ON
GO
CREATE TABLE [dbo].[pcDemo_SystemUsers](
     [RowID] [int] IDENTITY(1,1) NOT NULL,
     [UserLogin] [varchar](500) NOT NULL,
     [Password] [varchar](200) NULL,
     [UserFullName] [varchar](500) NULL,
     [UserLastName] [varchar](1000) NULL,
     [UserFirstName] [varchar](1000) NULL,
     [UserCompany] [varchar](200) NULL,
     [UserOfficeLocation] [varchar](200) NULL,
     [Department] [varchar](50) NULL,
     [UserTitle] [varchar](500) NULL,
     [Manager] [varchar](500) NULL,
     [UserPhone] [varchar](200) NULL,
     [UserEmail] [varchar](150) NULL,
     [CreatedDate] [datetime] NULL,
     [System_Role] [varchar](50) NULL,
     [ReadOnly] [varchar](1) NULL,
     [lastLogon] [datetime] NULL,
     [userAccountControl] [varchar](50) NULL,
     [TwitterHandle] [varchar](50) NULL,
     [BlogAddress] [varchar](500) NULL,
     [FacebookPage] [varchar](500) NULL,
     [SSN] [varchar](12) NULL
) ON [PRIMARY]
GO
SET ANSI_PADDING OFF
GO
ALTER TABLE [dbo].[pcDemo_SystemUsers] ADD  CONSTRAINT [DF_SystemUsers_CreatedDate]  DEFAULT (getdate()) FOR [CreatedDate]
GO
Getting User Information from AD
To query Active Directory, we will be using the Get-ADUser cmdlet, and as we learned from my previous post, Sync Active Direcory to SQL, lastLogon time is stored on each Domain Controller so we will need to query each server to get each person's lastLogon time. We will query each server by creating an array of Domain Controller server names, and query each server in the array. For example, to query the first server in the array, you would use the following command which will return all properties for each user and put the returned data into the Variable $Users:$Users = Get-ADUser -Filter * -Server $OUs[0] -Properties *We will go through the -Filter and -Properties parameters later in this post.
Do not take querying your servers lightly. You should talk to your AD team BEFORE querying your domain controllers, and see if they have a preferred server that they wish you to query and/or specific times that they wish you to run your queries. Obviously, if they do not want you to query each server, then you will not be able to get accurate lastLogon times. Also, this information could be important to them as a health check of their servers.
Now that you have your User Information, we will be manipulating the information and passing it into SQL.
Putting User Information into SQL (Attempt #1)
As in the previous post, I started by creating a table in SQL called Temp_ADUsers. Since we are now able to write a SQL query within PowerShell to insert information into SQL, I figured I would just loop through each individual user and insert them and their information into my table. Then I would query the second OU and update the table with each user's lastLogon time, and then the final server.
The SQL query looked like this (we will talk about the setLastLogon Function shortly):
foreach ($user in $Users)
{
   if ($user.SamAccountName -ne "Administrator" -and $user.SamAccountName -ne "Guest" -and $user.DisplayName.Length -gt 1)
   {
      $sAMAccountName = $user.sAMAccountName
      $firstName = $user.GivenName
      $lastName = $user.Surname
      $displayName = $user.displayName
      $company = $user.company
      $department = $user.department
      $title = $user.title
      $manager = $user.manager
      $telephoneNumber = $user.telephoneNumber
      $mail = $user.mail
      $userAccountControl = $user.userAccountControl
      $lastLogon = setLastLogon($user.lastLogon)
      $query1 = "INSERT INTO [dbo].[Temp_ADUsers]
      (
         [UserLogin]
        ,[FirstName]
        ,[LastName]
        ,[DisplayName]
        ,[UserAffiliation]
        ,[UserOrganization]
        ,[UserTitle]
        ,[Manager]
        ,[UserPhone]
        ,[UserEmail]
        ,[userAccountControl]
        ,[DC01_lastLogon_Raw]
      )
      VALUES
      (
         '$sAMAccountName'
        ,'$firstName'
        ,'$lastName'
        ,'$displayName'
        ,'$company'
        ,'$department'
        ,'$title'
        ,'$manager'
        ,'$telephoneNumber'
        ,'$mail'
        ,$userAccountControl
        ,'$lastLogon'
       )"
       Invoke-Sqlcmd -query $query1 -database "pcDemo_Personnel" -ServerInstance "sql2012-03"
   }
}
Within the script, I put some time tracking in an Out-File so that I could track the Get-ADUser query time (proof for the AD Team if needed), as well as the time it takes to insert/update SQL. My times returned were pretty horrible...

If you recall, another issue with dealing with the lastLogin property is that the lastLogon time is "number of 100 nanosecond intervals since January 1, 1601 (UTC)" To solve this issue, I created a function with a foreach to take care of cleaning up the lastLogon time and converting it to a dateTime in UTC (Zulu):
foreach ($user in $users)
{
    if (!$user.lastLogon)
       {
          $user.lastLogon = 0
       }
    else
       {
          $user.lastLogon = [datetime]::FromFileTime($user.lastLogon).ToString('u')
       }
}
Putting User Information into SQL (Attempt #2)The short lived Attempt #2 was based off a multiple item insert so that I could get rid of the foreach loop. It was a short lived idea because you can only bulk insert up to 1,000 items into SQL. Then I started looking into SQL's Bulk Insert Query, which led me to a question posed in StackOverflow, which led me to the Hey, Scripting Guy! Blog titled Use PowerShell to Collect Server Data and Write to SQL. After reading both articles, it became evident to me that every Server or Network Administrator now has the ability to take Enterprise Information and dump it into SQL. In my opinion, THIS IS HUGE!!! Thank you again Chad Miller (@cmille19) for creating and sharing your SQL Functions!
Putting User Information into SQL (Attempt #3)
After reading through both blog posts mentioned above, I had an understanding of what needed to be done. I added the new functions to my script and commented out the foreach lastLogon cleanup loop to pass just raw data into the DataTable and into SQL. I gave it a run, and ran into an issue:

# Get AD Properties
$properties = ("sAMAccountName", "displayName", "mail", "telephoneNumber", "physicalDeliveryOfficeName", "department", "userAccountControl", "company", "title", "lastLogon", "manager", "givenName", "Surname")
# Get Users
$users = $null
$users = Get-ADUser -Filter * -Server $ouServer -Properties (foreach{$properties})
To get around this error, I piped the output into a new table:$users = Get-ADUser -Filter * -Server $ouServer -Properties (foreach{$properties}) | Select (foreach{$properties})
Ran the script again and received a new error:

Now that we are able to load User data into SQL, it is time to put the rest of the script together, like Drop the Temp Tables, Set the Get-ADUser -Filter, and move the data from the Temp Tables into the Master AD Users Table.
Dropping Existing SQL Tables
Because the functions that create the SQL data tables do not automatically check to see if the tables exist before creation, it is necessary to delete existing tables so that we can import the data from AD.
# Drop table if it exists
$query1 = "IF OBJECT_ID('dbo.$tableName', 'U') IS NOT NULL DROP TABLE dbo.$tableName"
Invoke-Sqlcmd -Query $query1 -Database $databaseName -ServerInstance $dbServer
Filtering Out Unwanted UsersThere are accounts within AD that you probably do not want to surface, synchronize, and expose their properties, such as the Administrator account, Service accounts, and the krbtgt account. The quickest way is to use the Filter parameter. Typically these accounts do not have displayNames, so filtering out empty values should return People. This may not be true for your organization, however, your organization should have some sort of governance over the naming structure of service accounts. My Get-ADUser cmd looks like this:
$users = Get-ADUser -Filter {displayName -like "*"} -Server $ouServer -Properties (foreach{$properties}) | Select (foreach{$properties})
Clean SQL Table from the 1st Domain Controller Since I had to put a zero in for null values for the lastLogon time, it is necessary to clean up the table. Luckily it is pretty easy to set all 0 values back to null.
$query2 = "UPDATE [dbo].$tableName SET lastLogon = NULL WHERE lastLogon = '0'"
Invoke-Sqlcmd -Query $query2 -Database $databaseName -ServerInstance $dbServer
Update Current Users in Production Table
Now that all data from all Domain Controllers has been returned, and placed into Temporary SQL tables, we can update the users' information in the Production Table:
$tempTableName = "temp_" + $OUs[0] + "_Table"
$query11 = "UPDATE active
            SET
               active.UserLogin = LOWER(temp.sAMAccountName),
               active.UserFullName = temp.displayName,
               active.UserLastName = temp.Surname,
               active.UserFirstName = temp.givenName,
               active.UserCompany = temp.company,
               active.UserOfficeLocation = temp.physicalDeliveryOfficeName
               active.UserTitle = temp.title
               active.Manager = temp.manager,
               active.UserPhone = temp.telephoneNumber,
               active.UserEmail = temp.mail,
               active.lastLogon = CONVERT(DATETIME, temp.lastLogon),
               active.userAccountControl = temp.userAccountControl
               active.Department = temp.department
            inner join " + $tempTableName + " temp
               on active.UserLogin = temp.sAMAccountName
            WHERE LOWER(active.UserLogin) = LOWER(temp.sAMAccountName)
Invoke-Sqlcmd -Query $query11 -Database $databaseName -ServerInstance $dbServer
Inserting New Users in Production TableAfter updating current users, it it time to insert new users into the production table. I run the Update query first to save time, granted only by the number of new users to be inserted, but time is time. This is how I add any new users into the Production Table:
$query12 = "INSERT INTO [" + $databaseName + "].[dbo].[" + $activeTableName + "]
(
   [UserLogin],
   [UserFullName],
   [UserLastName],
   [UserFirstName],
   [UserCompany],
   [UserOfficeLocation],
   [Department],
   [UserTitle],
   [Manager],
   [UserPhone],
   [UserEmail],
   [System_Role],
   [ReadOnly],
   [lastLogon],
   [userAccountControl]
)
   SELECTLOWER(sAMAccountName),
   [displayName],
   [givenName],
   [Surname],
   [company],
   [physicalDeliveryOfficeName],
   [department],
   [title],
   [manager],
   [telephoneNumber],
   [mail]
   [System_Role] = 'User',
   [ReadOnly] = 'Y',
   CONVERT(DATETIME, [lastLogon]),
   [userAccountControl]
FROM " + $tempTableName + " AS temp
WHERE sAMAccountName <> '' and not exists
(
   SELECT LOWER(UserLogin)
   FROM " + $activeTableName + " AS active
   WHERE LOWER(active.UserLogin) = LOWER(temp.sAMAccountName)
)"
Invoke-Sqlcmd -Query $query12 -Database $databaseName -ServerInstance $dbServer
Getting lastLogon From More Than 1 Domain Controller
For each Domain Controller, we are going to create a column in a new table called temp_lastLogonTimes to store the lastLogon times for each user, then we update the columns with that information:
foreach ($OU in $OUs)
{
   # Create OU Columns
   $columnName = $OU + "_lastLogon"
   $query5 = "ALTER TABLE temp_lastLogonTimes ADD " + $columnName + " varchar(1000)"
   Invoke-Sqlcmd -Query $query5 -Database $databaseName -ServerInstance $dbServer
}
# Insert and Update Times Into Temp Table
$counter = 0
foreach ($OU in $OUs)
{
   if ($counter -lt 1)
      {
      # Insert Names and Times
      $query6 = "INSERT INTO [dbo].[temp_lastLogonTimes]
                   ([sAMAccountName]
                    [" + $OU + "_lastLogon])
                 Select
                     sAMAccountName
                    ,lastLogon
                 FROM
                     temp_" + $OU + "_Table"
      Invoke-Sqlcmd -Query $query6 -Database $databaseName -ServerInstance $dbServer
      }
   # Update OU lastLogon Times
   $query7 = "UPDATE [dbo].[temp_lastLogonTimes]
              SET " + $OU + "_lastLogon = lastLogon
              FROM temp_" + $OU + "_Table
              WHERE temp_lastLogonTimes.sAMAccountName = temp_" + $OU + "_Table.sAMAccountName"
   Invoke-Sqlcmd -Query $query7 -Database $databaseName -ServerInstance $dbServer
   $counter ++
}
Now that the temp_lastLogonTimes table has the lastLogon times for each user from each Domain Controller, it is time to compare the times and find the true lastLogon time. To accomplish this in PowerShell, we will query the new temp_lastLogonTimes table, add a column for the lastLogon time to the temp_lastLogonTimes datatable, compare values, and update the row.# Get Table and Update Last Logon Value
$str_OUs = @()
foreach ($OU in $OUs)
{
$str_OUs += "ISNULL(" + $OU + "_lastLogon, 0) as " + $OU + "_lastLogon"
}
$str_OUs = $str_OUs -join ", "
$query8 = "SELECT sAMAccountName, " + $str_OUs + " from temp_lastLogonTimes"
$arrayLLT = @()
$arrayLLT = Invoke-Sqlcmd -Query $query8 -Database $databaseName -ServerInstance $dbServer
$arrayLLT | Add-Member -MemberType NoteProperty -Name "lastLogon" -Value ""
$arrayLength = $arrayLLT[0].Table.Columns.Count - 1
$counter = 0
foreach ($sAM in $arrayLLT.sAMAccountName
{
$max = $arrayLLT[$counter][1..$arrayLength] | Measure -Maximum
$arrayLLT[$counter].lastLogon = $max.Maximum
$counter ++
}
Updating lastLogon Time in Production TableLike before, we will take our datatable, create a final temp table in SQL, and move the data to the production table.
# Get DataTable
$arrayLLT = $arrayLLT | Select sAMAccountName, lastLogon
$dt2 = $arrayLLT | Out-DataTable
# Create SQL Table
Add-SqlTable -ServerInstance $dbServer -Database $databaseName -TableName $tableNameLLT -DataTable $dt2
# Write DataTable into SQL
Write-DataTable -ServerInstance $dbServer -Database $databaseName -TableName $tableNameLLT -Data $dt2
$query13 = "UPDATE [dbo].[" + $activeTableName + "]
            SET " + $activeTableName + ".lastLogon = temp_lastLogons.lastLogon
            FROM temp_lastLogons
            WHERE LOWER(temp_lastLogons.sAMAccountName) = LOWER(" + $activeTableName + ".UserLogin)"
Invoke-Sqlcmd -Query $query13 -Database $databaseName -ServerInstance $dbServer
Now that the solution is completed, let's look at the time to query 3 domain controllers:

You can download the complete code from GitHub:
Create The Timer Job
Now that we can synchronize all users from AD into SQL, we need to create a scheduled task to run our PowerShell script to keep SQL synchronized on a regular basis. Now, this can be run daily or every couple of hours pending on how your organization works.
Please review my post on Creating a Scheduled Task With PowerShell.
However, what if the server Admin will not allow you to create a timer job using the Task Scheduler? Luckily, a colleague of mine, Don Kirham (@DonKirkham) posed a similar question on our company's Yammer site. Don wanted to know if it was possible to use SQL Server Agent jobs to run the job instead. The answer is, yes you can, but it is not as straight forward as one would like. You can read how to run this the Sync AD to SQL script from a SQL Server Agent Job from my blog post called Run a PowerShell v3 Script From a SQL Server Agent Job
UPDATES:
11/29/2013 Added link to Creating a Scheduled Task Blog, and added more kudos to Chad Miller for his contribution of the SQL Functions.
01/01/2014 Added link to blog post: Run a PowerShell v3 Script From a SQL Server Agent Job
Monday, July 15, 2013
SharePoint, IIS, 503 errors and GPOs
One of the great things about my job is that I get to spend a bunch of time solving puzzles and fixing peoples' problems. I get to install SQL Server and SharePoint in existing, well established Federal environments. Incase you are unaware, in a segregated, secured environment, such as a Federal Agency, the left hand does not always talk to the right hand. The DNS team works apart from the Exchange Team, who works apart from the AD team, who is isolated from Network Ops team, who works independently from the firewall team, and so forth. Getting things accomplished in such an arena, can be challenging, and usually involves a vertical assent and decent approach, meaning I talk to my counterpart, they talk to their boss, who talks to, for example the AD Team's boss, and then my service accounts get created.
Scenario
I was working with a group out of Alaska and Seattle, WA, to get a SharePoint 2010 Enterprise environment with SQL Server 2008R2 up and running after the group finished a domain migration.
SQL Issues
As with any SharePoint Farm installation, I installed SQL first. Everything seemed to have installed correctly, however after reboot, the SQL Server instance and the SQL Agent instance would not fire up, as seen in Figure 1.
 Figure 1: Showing the stopped SQL Server and SQL Agent accounts.
In the process of troubleshooting, I opened up the service instance for the SQL Server Service and verified that the password was correct. As seen in Figure 2, after entering the account password, I was greeted with a message.
 Figure 2: Shows that after entering the account password, that the account has been granted the Log On As A Service right.
This pointed me in the right direction for the first problem in this environment. The service accounts that were created in Active Directory (AD) had a GPO rule that new accounts could not Log On As A Service. The new accounts were put into a new Security Group, ran a gpupdate /force (http://technet.microsoft.com/en-us/library/bb490983.aspx), rebooted the server and SQL was now able to be rebooted successfully and have the service instances come up running!
SharePoint Issues
Unfortunately, placing all the service accounts into the new Security Group did not stop all the issues within the Farm. SharePoint installed correctly, and Central Administration(CA) provisioned and started correctly, however, after rebooting the server, I would receive a 503 error when trying to get to CA. Typically you would receive a 503 error when the Application Pool Account for your site has been stopped. After manually starting the account and clicking on the CA link, I would get a 503 error and my Application Pool Accounts would be stopped again, as seen in Figure 3.
 Figure 3: After browsing through the IIS sites, the Application Pools would stop.
Which brought up the following in the error logs:
Log Name: System
Source: Microsoft-Windows-WAS
Date: 6/28/2013 7:40:21 AM
Event ID: 5021
Task Category: None
Level: Warning
Keywords: Classic
User: N/A
Computer:
Description:
The identity of application pool SharePoint Central Administration v4 is invalid. The user name or password that is specified for the identity may be incorrect, or the user may not have batch logon rights. If the identity is not corrected, the application pool will be disabled when the application pool receives its first request. If batch logon rights are causing the problem, the identity in the IIS configuration store must be changed after rights have been granted before Windows Process Activation Service (WAS) can retry the logon. If the identity remains invalid after the first request for the application pool is processed, the application pool will be disabled. The data field contains the error number.
Event Xml: (removed)
, I was a little bit closer. Finally I read this KB article from Microsoft that really solved the problem:

Scenario
I was working with a group out of Alaska and Seattle, WA, to get a SharePoint 2010 Enterprise environment with SQL Server 2008R2 up and running after the group finished a domain migration.
SQL Issues
As with any SharePoint Farm installation, I installed SQL first. Everything seemed to have installed correctly, however after reboot, the SQL Server instance and the SQL Agent instance would not fire up, as seen in Figure 1.

In the process of troubleshooting, I opened up the service instance for the SQL Server Service and verified that the password was correct. As seen in Figure 2, after entering the account password, I was greeted with a message.

This pointed me in the right direction for the first problem in this environment. The service accounts that were created in Active Directory (AD) had a GPO rule that new accounts could not Log On As A Service. The new accounts were put into a new Security Group, ran a gpupdate /force (http://technet.microsoft.com/en-us/library/bb490983.aspx), rebooted the server and SQL was now able to be rebooted successfully and have the service instances come up running!
SharePoint Issues
Unfortunately, placing all the service accounts into the new Security Group did not stop all the issues within the Farm. SharePoint installed correctly, and Central Administration(CA) provisioned and started correctly, however, after rebooting the server, I would receive a 503 error when trying to get to CA. Typically you would receive a 503 error when the Application Pool Account for your site has been stopped. After manually starting the account and clicking on the CA link, I would get a 503 error and my Application Pool Accounts would be stopped again, as seen in Figure 3.

Which brought up the following in the error logs:
Log Name: System
Source: Microsoft-Windows-WAS
Date: 6/28/2013 7:40:21 AM
Event ID: 5021
Task Category: None
Level: Warning
Keywords: Classic
User: N/A
Computer:
Description:
The identity of application pool SharePoint Central Administration v4 is invalid. The user name or password that is specified for the identity may be incorrect, or the user may not have batch logon rights. If the identity is not corrected, the application pool will be disabled when the application pool receives its first request. If batch logon rights are causing the problem, the identity in the IIS configuration store must be changed after rights have been granted before Windows Process Activation Service (WAS) can retry the logon. If the identity remains invalid after the first request for the application pool is processed, the application pool will be disabled. The data field contains the error number.
Event Xml: (removed)
, I was a little bit closer. Finally I read this KB article from Microsoft that really solved the problem:
http://support.microsoft.com/kb/981949 (see Figure 4)

Figure 4: Shows the default permissions and user rights for IIS 7.0, IIS 7.5, and IIS 8.0
So, after having the security policy modified to allow the IIS_IUSRS to Log On As A Batch Job, we ran a gpupdate /force, rebooted the server and the IIS Application Pool was able to stay up and running after trying to access Central Administration.
Update 12/29/2014
Recently, while working with a customer, I ran into interesting issue with my content service account (eg: spContent). I was able to provision my farm, create all of my service accounts, and create my Web Application and Site Collection. I was able to open Central Administration, however, when I tried to browse to the Site Collection URL, I would receive an error.
It was a bit odd that everything else worked, but the web page would not render.
Now, I was in an environment known for having issues with GPO and had a bunch of devices in the background doing all kinds of packet inspection, so I was a bit hesitant as to what could be the error.
Luckily I did find a very helpful blog post: SharePoint 2013: An exception occurred when trying to establish endpoint for context: Could not load file or assembly...
This article basically asks to make sure that Impersonate a client at authentication has local rights.
Summary
Make sure your Service Accounts can Log On As A Service and that your IIS_IUSRS are allowed to Log On As A Batch Job. You might need to have the Impersonate a client at authentication has local rights as well.
Make sure that you do an iisreset after you push your GPO updates (or reboot the server(s)).
Make sure that you do an iisreset after you push your GPO updates (or reboot the server(s)).
Monday, October 1, 2012
SPSRED: Upgrading your SharePoint and SQL Environments
I was fortunate enough to have scheduled the end of a client engagement to coincide with the start of SharePoint Saturday Redmond. When I had submitted the topic, I was kind of hoping to not have it selected, as there was a lot of work that would need to be done. That being said, here is my presentation:
Here is the farm layout:
Here is the template that I used when creating SQL Cluster and HA Group:
Here is the output file from the Test-SPContentDatabase:
All files are located here:
https://skydrive.live.com/redir?resid=8E55AA8C038225F8!4265
Here is the farm layout:
Here is the template that I used when creating SQL Cluster and HA Group:
Here is the output file from the Test-SPContentDatabase:
All files are located here:
https://skydrive.live.com/redir?resid=8E55AA8C038225F8!4265
Tuesday, May 29, 2012
Verify Your SQL Connection / Get Connection String
I have been very fortunate to have some fantastic mentors. One of them is a gentleman by the name of Ken Ammann, who taught me this trick when you need to verify your SQL connection or get your connection string.


1) From your desktop, right-click and create a new text document.

2) Change the file extension from .txt to .udl

becomes:
3) Click Yes to verify the change of extension type.

4) Open the UDL file and set properties.

5) Test the connection.
6) Click OK.
7) Change file extension back to .txt
8) Take a look at your connection string.

It is a nice easy way to verify your SQL connections when you need to verify that you still have a SQL connection. The real reason that I wrote this post is that I was spending too much time trying to recall the UDL extension name.
Friday, April 6, 2012
Tuesday, March 6, 2012
Restore SQL DBs Using PowerShell
Of course the next logical thing after getting your backup script working is to create your restore script... I used Donabel Santos's script from http://www.sswug.org/articles/viewarticle.aspx?id=44909 as a reference.
$restoreDir = "c:\shared\Temp\" # last slash very important!

if ((test-path $restoreDir) -eq $false ) # Verify folder exists
  {
     $a = Read-Host("Path Not Found!")
     Exit -1
  }

[System.Reflection.Assembly]::LoadWithPartialName("Microsoft.SqlServer.SMO") | out-null
[System.Reflection.Assembly]::LoadWithPartialName("Microsoft.SqlServer.SmoExtended") | out-null
[Reflection.Assembly]::LoadWithPartialName("Microsoft.SqlServer.ConnectionInfo") | Out-Null
[Reflection.Assembly]::LoadWithPartialName("Microsoft.SqlServer.SmoEnum") | Out-Null

$files = get-childitem $restoreDir -recurse
foreach ($file in $files)
  {
    $backupFile = $restoreDir + $file
    $server = New-Object ("Microsoft.SqlServer.Management.Smo.Server") "(local)"
    $backupDevice = New-Object ("Microsoft.SqlServer.Management.Smo.BackupDeviceItem") ($backupFile, "File")
    $dbRestore = new-object("Microsoft.SqlServer.Management.Smo.Restore")
    $dbRestore.NoRecovery = $false;
    $dbRestore.ReplaceDatabase = $true;
    $dbRestore.Action = "Database"
    $dbRestore.Devices.Add($backupDevice)
    $dbRestoreDetails = $dbRestore.ReadBackupHeader($server)
    "Restoring Database: " + $dbRestoreDetails.Rows[0]["DatabaseName"]
    $dbRestore.Database = $dbRestoreDetails.Rows[0]["DatabaseName"]
    $dbRestore.SqlRestore($server)
  }
Friday, March 2, 2012
Get First and Last Day of Current Month in SQL
I have been spending most of the last couple of day hammering out reports in SSRS. I needed to get information for the current month, but needed to know the first and last dates to set my query. I do not want to run into any kind of Azure Date issues (http://www.wired.com/wiredenterprise/2012/03/azure-leap-year-bug/)
declare @reportDate datetime
declare @lastDate datetime
set @reportDate = GETDATE()
Set @reportDate = DateAdd(Day, 1, @reportDate - Day(@reportDate) + 1) -1
Set @lastDate = DateAdd(Month, 1, @reportDate - Day(@reportDate) + 1) -1
select @reportDate, @lastDate
Update (05/01/2012):
I was not very happy with the above query, so I have updated it... I have also added the functionality to set the time back to midnight...

Update (05/01/2012):
I was not very happy with the above query, so I have updated it... I have also added the functionality to set the time back to midnight...
declare @first datetime
declare @last datetime
set @first = dateadd(day, 1, getdate() - day(getdate()))
set @last = dateadd(day, -1, dateadd(month, 1, @first))
select @first, @last
set @first = DATEADD(dd, DATEDIFF(dd, 0, @first), 0)
set @last = DATEADD(dd, DATEDIFF(dd, 0, @last), 0)
select @first, @last

Thursday, February 16, 2012
Backing Up SQL DBs Using PowerShell
My next project requires that I create several SQL Mirrors, and instead of backing up my databases with SQL, I thought I would try it in PowerShell. The majority of the script is from Edwin Sarmiento's blog http://www.mssqltips.com/sqlservertip/1862/backup-sql-server-databases-with-a-windows-powershell-script/ (Excellent Post)
Update: (03/05/2012)
Added save location verification else create folder.
$bkdir = "\\serverName\Shared\Temp" # Set Backup Path! (optional "C:\Temp")

if ((test-path $bkdir) -eq $false ) # Verify folder else create it...
  {
     [IO.Directory]::CreateDirectory($bkdir)
  }

[System.Reflection.Assembly]::LoadWithPartialName("Microsoft.SqlServer.SMO") | out-null
[System.Reflection.Assembly]::LoadWithPartialName("Microsoft.SqlServer.SmoExtended") | out-null
$s = new-object ("Microsoft.SqlServer.Management.Smo.Server") $instance

$dbs = $s.Databases
foreach ($db in $dbs)
  {
     if(($db.Name -ne "tempdb") -and ($db.Name -ne "master") -and ($db.Name -ne "model") -and ($db.Name -ne "msdb"))
          {
               $dbname = $db.Name
               $dbBackup = new-object ("Microsoft.SqlServer.Management.Smo.Backup")
               $dbBackup.Action = "Database"
               $dbBackup.Database = $dbname
               $dbBackup.Devices.AddDevice($bkdir + "\" + $dbname + ".bak", "File")
               $dbBackup.SqlBackup($s)
               write-host($db.name + " has been backed up.")
          }
  }
If you are saving to a network location, the SQL SA account and the person running the script need to have read/write permissions to the location.Update: (03/05/2012)
Added save location verification else create folder.
Monday, January 16, 2012
Get The DBO From All SQL Databases
I have finally decided to start keeping track of the useful SQL commands that I have used. Mostly because I am tired of rewriting them. Also, if I have had to use them, then I sure that someone else (or me again) might find them useful.
While moving databases around within SQL to optimize IOPS and/or drive utilization, you might have a need to put the Database Owner back to what it was originally. Before you drop your databases, take a look at the DBO first.
This will grab all the dbo's of all the databases on your server:
 To fix this problem, run the following:
Added drop user and change owner code.
While moving databases around within SQL to optimize IOPS and/or drive utilization, you might have a need to put the Database Owner back to what it was originally. Before you drop your databases, take a look at the DBO first.
This will grab all the dbo's of all the databases on your server:
select SUSER_SNAME(owner_sid) as username, name from sys.databasesNow, if you want to change the DBO...
sp_changeDbOwner @loginame = 'domain\username'However, you might run into an error is the DBO is already a user or aliased in the database.
USE <databaseName>
GO
SP_DROPUSER 'domain\username'
GO
SP_CHANGEDBOWNER 'domain\username'
UPDATE 02/04/2015
Added drop user and change owner code.
Saturday, August 13, 2011
Thursday, March 17, 2011
Increase Time Before Connection Timeout Between SQL and SharePoint
I have run into an issue with a couple of clients where a Connection Timeout Error occurs on either very large SSRS reports or in some custom web parts pulling data from SQL. By default, the connection between SharePoint and your SQL servers will timeout after 120 seconds. My current client just had me create a report that takes about 8.5 minutes to complete rendering... oops, error!
This is how you fix the timeout issue:
1) Go to the virtual directory for the site that is timing out.
C:\inetpub\wwwroot\wss\VirtualDirectories\yourSite
2) Make a backup of the web.config file.
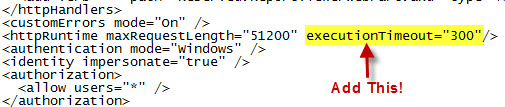
3) Edit the web.config file and add an httpRuntime property called "executionTimeout"
In the example below, my connection will now timeout after 5 minutes (300 seconds).
This is how you fix the timeout issue:
1) Go to the virtual directory for the site that is timing out.
C:\inetpub\wwwroot\wss\VirtualDirectories\yourSite
2) Make a backup of the web.config file.
3) Edit the web.config file and add an httpRuntime property called "executionTimeout"
In the example below, my connection will now timeout after 5 minutes (300 seconds).

Tuesday, March 1, 2011
Create a Data Grid View Using SPD 2007 and a SQL Stored Procedure
Let's say that we have a SQL table of Resources (people), and in another SQL table we have their schedules. How can we view a list of people who are available to work certain dates? Basically, we want the user to enter a "Start Date" and an "End Date" and retrieve a Data Grid list of all people in the company who are available to work within those dates.
 5) Within the PlaceHolderMain, I am going to add a 4x4 table. Table > Insert Table
1) Create the sample databases and data.

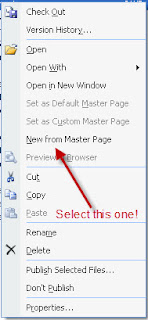
3) Next, we will open up SharePoint Designer 2007, and go to the top level of the site. For example, http://pc2007.local. We are now going to create a blank page based off the default,master page.
http://pc2007.local > _catalogs > masterpage > default.master. Right click the default.master and select "New from Master Page". This will open up a blank web page.


4) To incorporate out own ideas, we will need to go to the Common Content Tasks for PlaceHolderMain and select Create Custom Content.

6) I am going to label my columns and insert 2 Calendar Date Pickers.
 7) We now want to change the ids from "Calendar1" to "indate" and from "Calendar2" to "enddate"
 8) Within the Data Source Library tab, click "Connect to a database..."

9) Enter your SQL server information, click Next. And you will receive a warning about passwords being saved as plain text.
10) Select the database where your tables are stored, and we are going to select the Stored Procedure radial button.
 11) Click Finish! A new window should pop-up to Edit Custom SQL Commands.
12) Under the Select tab, select the Stored Procedure radial button (again) and select the appropriate stored procedure, and click the "OK" button.
13) Select the "General Tab" and give your database connection a useful name... and save it!
14) This is just my preference, but I will select the bottom left cell of my table to insert my source control...
 15) Hover your mouse over the newly created database connection and select "Insert Data Source Control" A Refresh Data Source Schema will pop-up, and you will want to click the "Ok" button.
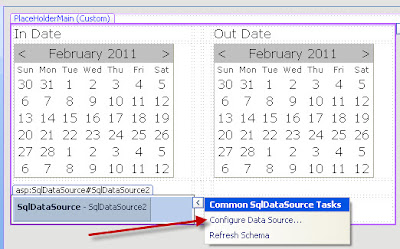
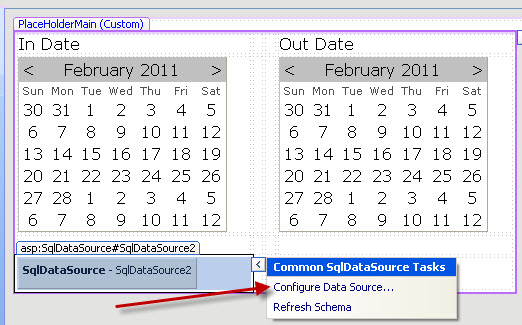
 16) You will want to open the Common SqlDataSource Tasks and select "Configure Data Source..."
 17) Click Next as we have already created the connection
18) However, we want to save the connection string locally, so give it a friendly name, and click Next.
 19) Verify the "Specify a custom SQL statement of stored procedure" radial button is selected, and click Next.
20) Under the Select tab, select the Stored Procedure radial button, find your Stored Procedure, and click Next.
 21) We now want to tell the connection what variables we want to pass to the Stored Procedure. Our sources are both "Control" types. However for the "enddate", make sure that your ControlID is the name of the control that has the End Date... We had named the calendar "enddate".
22) Set up the In Date control and press the Next button, and then the Finish button. You will get a warning about where the configuration for the connection is being saved.
 23) Merge the rows under the calendar.
 24) Under the Toolbox tab, we are going to expand the Data Section, grab the GridView control and drop it into the row under the calendar... The one where we just merged the cells...
 25) Open up the Common GridView Tasks and under the Choose Data Source, select your Data Source.
 26) Under the Common GridView Tasks, enable Paging and Enable Sorting.
 27) Save your work, check in your document, navigate to your new page, select an In and Out Date, and look at who is available!


9) Enter your SQL server information, click Next. And you will receive a warning about passwords being saved as plain text.
10) Select the database where your tables are stored, and we are going to select the Stored Procedure radial button.

12) Under the Select tab, select the Stored Procedure radial button (again) and select the appropriate stored procedure, and click the "OK" button.
13) Select the "General Tab" and give your database connection a useful name... and save it!
14) This is just my preference, but I will select the bottom left cell of my table to insert my source control...


18) However, we want to save the connection string locally, so give it a friendly name, and click Next.

20) Under the Select tab, select the Stored Procedure radial button, find your Stored Procedure, and click Next.

22) Set up the In Date control and press the Next button, and then the Finish button. You will get a warning about where the configuration for the connection is being saved.


Subscribe to:
Posts (Atom)