Saturday, November 12, 2011
SPSDenver: Using REST to Create A No Code Web Part
The actual file is located here:
https://skydrive.live.com/P.mvc#!/?cid=8e55aa8c038225f8&sc=documents&id=8E55AA8C038225F8%21286
Saturday, August 13, 2011
Friday, August 12, 2011
SPCTCDC 2011 Weather RSS Presentation
The actual file is located here:
https://skydrive.live.com/redir.aspx?cid=8e55aa8c038225f8&resid=8E55AA8C038225F8!149
Wednesday, August 10, 2011
Force .eml Files to Open in Outlook 2007
Background
Files being collected in SharePoint email enabled lists are being received as .eml files by default since SharePoint uses SMTP services for receiving email. The problem is that people want to use Outlook, not Outlook Exprerss to view their emails, and .eml files are not native to Outlook 2007 or earlier.
Workaround
1) Modify the client registry:
a. Make a backup of the following eml-file registration:
i. HKEY_CLASSES_ROOT\.eml
b. Install appropriate eml-Outlook2007-xxx.reg file by double clicking the file.
2) Set the .eml file default to open in Outlook 2007
a. Right click a .eml file
b. Open With à Choose default program…
c. Choose Outlook.exe
i. C:\\Program Files\Microsoft Office\Office12\Outlook.exe
3) Modify the client registry again:
a. Make a backup of the following registration:
i. HKEY_CLASSES_ROOT\MIME
b. Modify “HKEY_CLASSES_ROOT\MIME\Database\Content Type\message/rfc822”
extension=".eml"
CLSID=""
extension=".eml"
CLSID=""
c. Information take from:
http://social.msdn.microsoft.com/Forums/en-US/vbgeneral/thread/d94c0d4e-0d32-4648-bdd6-dc3f28bb4797/
http://social.msdn.microsoft.com/Forums/en-US/vbgeneral/thread/d94c0d4e-0d32-4648-bdd6-dc3f28bb4797/
Monday, July 4, 2011
Creating a Central Admin Desktop Shortcut Using PowerShell
While working on a deployment script, I thought it would be nice to add the Central Admin shortcut to the desktop of All Users. You can get a lot of information from http://ss64.com/vb/shortcut.html concerning creating shortcuts, but if you want to add the shortcut for All Users:
# Add Central Admin Shortcut to All Desktops
$wshshell = New-Object -ComObject WScript.Shell
$desktop =  $wshShell.SpecialFolders.Item("AllUsersDesktop")
$lnk = $wshshell.CreateShortcut($desktop + "\SharePoint 2010 Central Administration.lnk")
$lnk.TargetPath = "C:\Program Files\Common Files\Microsoft Shared\Web Server Extensions\14\BIN\psconfigui.exe"
$lnk.Arguments = "-cmd showcentraladmin"
$lnk.Description = "Views the Central Administration Web Application."
$lnk.IconLocation = "%SystemRoot%\Installer\{90140000-1014-0000-1000-0000000FF1CE}\shcentadm.exe"
$lnk.Save()
Monday, March 28, 2011
Deploy and Retract .wsp Files using STSADM or PowerShell
As recommended in previous posts on using STSADM; I suggest creating a .cmd file to run the scripts, and save the scripts in a folder. I am also assuming that you have STSADM added to your variable path. Don't forget to right click, and run as Administrator!
Deploy with STSADM:
Retract with STSADM:
Remember, to run the following commands you must have SPShellAdmin permissions (see Add-SPShellAdmin)
Add, Install, Enable, Update, Disable, Uninstall, and Remove Farm or User Solutions (SPUserSolution) with PowerShell:
1) Update lines 1-4 (and line 6 if working with sandboxed solutions).
2) Remove the pound(#) symbol of the command you want to run.
Finally added the ability to Add, Enable, Update, Deactivate, and Remove Sandboxed Solutions (SPUserSolutions).
Added write-host output so that you know what you did...
Update (01/26/2015)
Added a closing parenthesis ")" for installing solution, and fixed some spelling errors
Deploy with STSADM:
stsadm -o addsolution -filename path\solutionName.wsp
stsadm -o deploysolution -name solutionName.wsp -immediate -allowgacdeployment -force -allcontenturls
stsadm -o execadmsvcjobs
pause
iisreset /noforce
Retract with STSADM:
stsadm -o retractsolution -name solutionName.wsp -immediate -allcontenturls
stsadm -o execadmsvcjobs
pause
stsadm -o deletesolution -name solutionName.wsp -override
pause
iisreset /noforce
Remember, to run the following commands you must have SPShellAdmin permissions (see Add-SPShellAdmin)
Add, Install, Enable, Update, Disable, Uninstall, and Remove Farm or User Solutions (SPUserSolution) with PowerShell:
1) Update lines 1-4 (and line 6 if working with sandboxed solutions).
2) Remove the pound(#) symbol of the command you want to run.
$fileLocation = "C:\Projects\Event Receiver\bin\Debug"
$wspFileName = "Event_Receiver.wsp"
$featureIdentity = "Event Receiver_Feature1"
$url = "http://pc2010.local/"
# Sandboxed Solution Upgrade Name
$toSolutionName = "Event_Receiver_v2.wsp"

Add-PSSnapin Microsoft.SharePoint.PowerShell -EA 0
$literalPath = $fileLocation + "\" + $wspFileName
Write-Host("Using WSP from: " + $literalPath)

<#
    *****************************
    *       Farm Solutions      *
    *****************************
#>

# Add WSP Solution (http://technet.microsoft.com/en-us/library/ff607552.aspx)
# Write-Host("Adding solution to Farm..."); Add-SPSolution -literalpath $literalPath

# Update Existing WSP Solution (http://technet.microsoft.com/en-us/library/ff607724.aspx)
# Write-Host("Updating solution in Farm..."); Update-SPSolution -identity $wspFileName -literalpath $literalPath -gacdeployment

# Deploy WSP solution to the Farm (http://technet.microsoft.com/en-us/library/ff607534.aspx)
# Write-Host("Deploying solution to the Farm..."); Install-SPSolution -identity $wspFileName -allwebapplications -gacdeployment -force

# Enable an installed feature at the given scope (http://technet.microsoft.com/en-us/library/ff607803.aspx)
# If the feature is a farm feature, no URL is needed
# Write-Host("Enabling Feature..."); Enable-SPFeature -identity $featureIdentity -url $url

# Disable a feature at the given scope (http://technet.microsoft.com/en-us/library/ff607879.aspx)
# If the feature is a farm feature, comment out -URL Parameter
# Write-Host("Disabling Feature..."); Disable-SPFeature -identity $featureIdentity -force -confirm:$false -url $url

# Retract WSP solution from the farm (http://technet.microsoft.com/en-us/library/ff607873.aspx)
# Write-Host("Retracting Solution from Farm..."); Uninstall-SPSolution -identity $wspFileName -confirm:$false

# Delete WSP solution from the farm (http://technet.microsoft.com/en-us/library/ff607748.aspx)
# Write-Host("Deleting solution from Farm..."); Remove-SPSolution -identity $wspFileName -force -confirm:$false

<#
    *****************************
    *       User Solutions      *
    *****************************
#>

# Add sandboxed solution to solution gallery (http://technet.microsoft.com/en-us/library/ff607715.aspx)
# Write-Host("Adding user solution to solution gallery..."); Add-SPUserSolution -LiteralPath $literalPath -Site $url

# Activate the sandboxed solution in a site collection (http://technet.microsoft.com/en-us/library/ff607653.aspx)
# Write-Host("Enabeling sandboxed solution..."); Install-SPUserSolution -identity $wspFileName -Site $url

# Upgrade EXISTING activated sandboxed solution (http://technet.microsoft.com/en-us/library/ff607902.aspx)
# Write-Host("Updating sandboxed solution..."); Update-SPUserSolution -identity $wspFileName -Site $url -ToSolution $toSolutionName

# Deactivate a sandboxed solution from site collection (http://technet.microsoft.com/en-us/library/ff607582.aspx)
# Write-Host("Retracting sandboxed solution..."); Uninstall-SPUserSolution -identity $wspFileName -Site $url -confirm:$false

# Delete a sandboxed solution from site collection (http://technet.microsoft.com/en-us/library/ff607709.aspx)
# Write-Host("Deleting sandboxed solution..."); Remove-SPUserSolution -identity $wspFileName -Site $url -confirm:$false
Update (11/2/2014)Finally added the ability to Add, Enable, Update, Deactivate, and Remove Sandboxed Solutions (SPUserSolutions).
Added write-host output so that you know what you did...
Update (01/26/2015)
Added a closing parenthesis ")" for installing solution, and fixed some spelling errors
Thursday, March 24, 2011
RSS Feeds from Google News
Sometimes the news sources you are trying to collect do not have good RSS feeds. Especially if you are trying to collect information about a very niche subject. Google has made it very easy to collect news to display as an RSS feed within SharePoint.
1) Go to http://news.google.com
2) Type in your search parameters
3) Modify the results URL by adding "&output=rss" at the end of the URL, and go to the new URL
4) Verify that you are indeed getting the feed.

4) Add the RSS Viewer webpart to your page
5) Under RSS Properties, in the RSS Feed URL, add the modified URL.

Thursday, March 17, 2011
Increase Time Before Connection Timeout Between SQL and SharePoint
I have run into an issue with a couple of clients where a Connection Timeout Error occurs on either very large SSRS reports or in some custom web parts pulling data from SQL. By default, the connection between SharePoint and your SQL servers will timeout after 120 seconds. My current client just had me create a report that takes about 8.5 minutes to complete rendering... oops, error!
This is how you fix the timeout issue:
1) Go to the virtual directory for the site that is timing out.
C:\inetpub\wwwroot\wss\VirtualDirectories\yourSite
2) Make a backup of the web.config file.
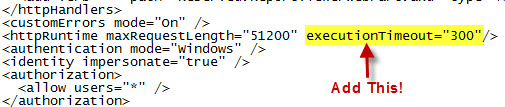
3) Edit the web.config file and add an httpRuntime property called "executionTimeout"
In the example below, my connection will now timeout after 5 minutes (300 seconds).
This is how you fix the timeout issue:
1) Go to the virtual directory for the site that is timing out.
C:\inetpub\wwwroot\wss\VirtualDirectories\yourSite
2) Make a backup of the web.config file.
3) Edit the web.config file and add an httpRuntime property called "executionTimeout"
In the example below, my connection will now timeout after 5 minutes (300 seconds).

Tuesday, March 1, 2011
Create a Data Grid View Using SPD 2007 and a SQL Stored Procedure
Let's say that we have a SQL table of Resources (people), and in another SQL table we have their schedules. How can we view a list of people who are available to work certain dates? Basically, we want the user to enter a "Start Date" and an "End Date" and retrieve a Data Grid list of all people in the company who are available to work within those dates.
 5) Within the PlaceHolderMain, I am going to add a 4x4 table. Table > Insert Table
1) Create the sample databases and data.

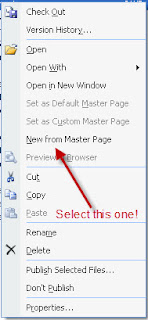
3) Next, we will open up SharePoint Designer 2007, and go to the top level of the site. For example, http://pc2007.local. We are now going to create a blank page based off the default,master page.
http://pc2007.local > _catalogs > masterpage > default.master. Right click the default.master and select "New from Master Page". This will open up a blank web page.


4) To incorporate out own ideas, we will need to go to the Common Content Tasks for PlaceHolderMain and select Create Custom Content.

6) I am going to label my columns and insert 2 Calendar Date Pickers.
 7) We now want to change the ids from "Calendar1" to "indate" and from "Calendar2" to "enddate"
 8) Within the Data Source Library tab, click "Connect to a database..."

9) Enter your SQL server information, click Next. And you will receive a warning about passwords being saved as plain text.
10) Select the database where your tables are stored, and we are going to select the Stored Procedure radial button.
 11) Click Finish! A new window should pop-up to Edit Custom SQL Commands.
12) Under the Select tab, select the Stored Procedure radial button (again) and select the appropriate stored procedure, and click the "OK" button.
13) Select the "General Tab" and give your database connection a useful name... and save it!
14) This is just my preference, but I will select the bottom left cell of my table to insert my source control...
 15) Hover your mouse over the newly created database connection and select "Insert Data Source Control" A Refresh Data Source Schema will pop-up, and you will want to click the "Ok" button.
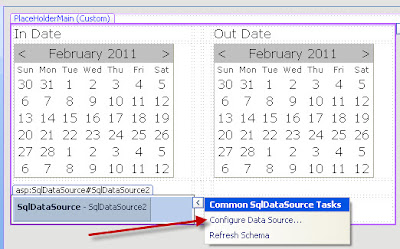
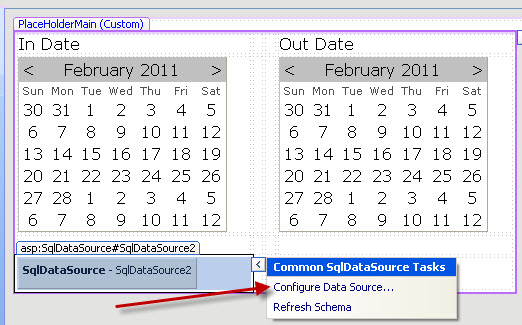
 16) You will want to open the Common SqlDataSource Tasks and select "Configure Data Source..."
 17) Click Next as we have already created the connection
18) However, we want to save the connection string locally, so give it a friendly name, and click Next.
 19) Verify the "Specify a custom SQL statement of stored procedure" radial button is selected, and click Next.
20) Under the Select tab, select the Stored Procedure radial button, find your Stored Procedure, and click Next.
 21) We now want to tell the connection what variables we want to pass to the Stored Procedure. Our sources are both "Control" types. However for the "enddate", make sure that your ControlID is the name of the control that has the End Date... We had named the calendar "enddate".
22) Set up the In Date control and press the Next button, and then the Finish button. You will get a warning about where the configuration for the connection is being saved.
 23) Merge the rows under the calendar.
 24) Under the Toolbox tab, we are going to expand the Data Section, grab the GridView control and drop it into the row under the calendar... The one where we just merged the cells...
 25) Open up the Common GridView Tasks and under the Choose Data Source, select your Data Source.
 26) Under the Common GridView Tasks, enable Paging and Enable Sorting.
 27) Save your work, check in your document, navigate to your new page, select an In and Out Date, and look at who is available!


9) Enter your SQL server information, click Next. And you will receive a warning about passwords being saved as plain text.
10) Select the database where your tables are stored, and we are going to select the Stored Procedure radial button.

12) Under the Select tab, select the Stored Procedure radial button (again) and select the appropriate stored procedure, and click the "OK" button.
13) Select the "General Tab" and give your database connection a useful name... and save it!
14) This is just my preference, but I will select the bottom left cell of my table to insert my source control...


18) However, we want to save the connection string locally, so give it a friendly name, and click Next.

20) Under the Select tab, select the Stored Procedure radial button, find your Stored Procedure, and click Next.

22) Set up the In Date control and press the Next button, and then the Finish button. You will get a warning about where the configuration for the connection is being saved.


Saturday, February 19, 2011
Programatically Create a SQL Table with a Variable in The Name
I ran into a situation where I needed to compare an Excel table to an existing SQL table, then update the SQL table with only the missing information. My goal was to create a temporary table, then compare and update. The problem for me arises when more than 1 user wants to update their information at once; I am worried that using a static name for a temp table might create issues. Here is how to create and delete a table with a variable in the name.
declare @makeTable nvarchar(max)
declare @delTable nvarchar(max)
declare @tablename varchar(200)
declare @variable varchar(20)
set @variable= 'userName'
set @tablename = 'Temp_ProjectRisksExcel_' + @variable
-- Create Tabele
set @makeTable = 'create table ' + @tablename +
'(
[ExecutionPlanCode] [varchar](20) NULL,
[RiskIdentifierCode] [varchar](40) NULL,
[RiskTitle] [varchar](250) NULL,
[RiskDescription] [varchar](1500) NULL,
[Occurrence] [varchar](50) NULL,
[Impact] [varchar](50) NULL,
[RiskConsequence] [varchar](1500) NULL,
[Strategy] [varchar](50) NULL,
[RiskMitigation] [varchar](1500) NULL,
[Comments] [varchar](1500) NULL,
[RiskRetired] [varchar](50) NULL,
[RiskRetiredComments] [varchar](1500) NULL,
[RiskRetiredDate] [date] NULL
)'
exec(@makeTable)
-- Delete Table
set @delTable = 'DROP TABLE ' + @tablename
exec(@delTable)
Thursday, February 10, 2011
Http to Https Redirect in IIS7
To keep with the subject of error pages, I thought it would be good to touch on how to redirect end users and force them to use port 443 instead of port 80. There is a very simple way to accomplish this in IIS7, using the same Error Pages Feature that we used in the last posting on creating a SharePoint Custom Login Error (401) Page.
1) Go to IIS and select your web site.
4) Add a Status Code of 403.4 and select Respond with a 302 redirect. Put in YOUR https address!

5) Open the SSL Settings in the IIS area for your site.


1) Go to IIS and select your web site.
2) If you have not already done so, edit the site bindings to add the port 443
3) Open the Error Pages Feature under the IIS area. In the right column, click Add.
3) Open the Error Pages Feature under the IIS area. In the right column, click Add.

4) Add a Status Code of 403.4 and select Respond with a 302 redirect. Put in YOUR https address!


5) Open the SSL Settings in the IIS area for your site.

6) Click the Require SSL check box, and click Apply in the upper right Actions column.

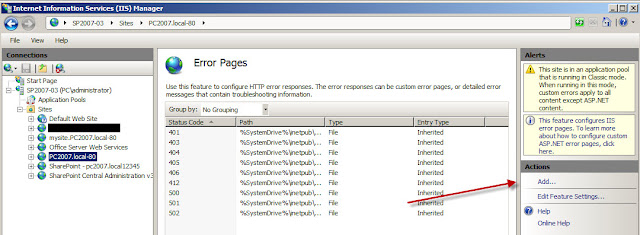
SharePoint Custom Login Error (401) Page
When dealing with lots of people logging into your SharePoint site, you will spend a lot of time answering phone calls from people with login errors. A nice and easy way to preemptively help deal with login failures is to use a custom error page.

1) Go to your IIS and look up where the custom errors are located for the site.

2) Look at the path location for the location of the error files.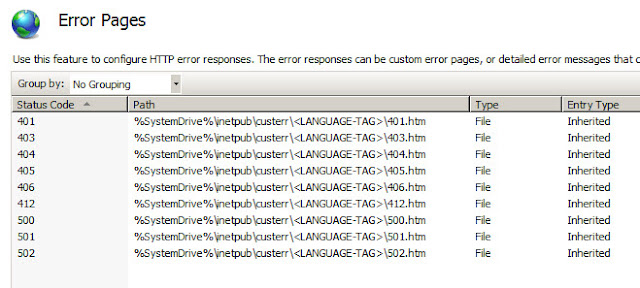
3) Go to the file location,, you will want to edit the 401.htm file.

4) The last step is to modify the web.config for your SharePoint site. You will need to add (modify) the system.webserver.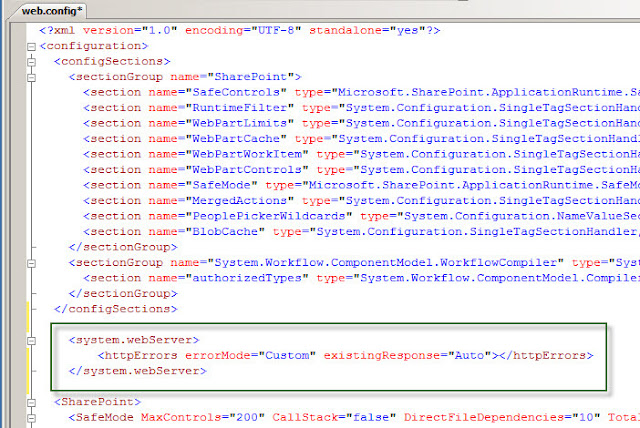
Download code here
To add custom error pages in different languages, just add the pages to the appropriate local language folder. You can find the local language folder information here... http://msdn.microsoft.com/en-us/library/bb266177.aspx

1) Go to your IIS and look up where the custom errors are located for the site.


3) Go to the file location,, you will want to edit the 401.htm file.

4) The last step is to modify the web.config for your SharePoint site. You will need to add (modify) the system.webserver.

Download code here
To add custom error pages in different languages, just add the pages to the appropriate local language folder. You can find the local language folder information here... http://msdn.microsoft.com/en-us/library/bb266177.aspx
Tuesday, February 8, 2011
Excel Import Over 255 Characters
Another Excel gotcha!!! I have a SQL column called myText and it is a varchar(2500), but when I tried to import the appropriate cell, I kept getting null values returned. If my cell was 255 characters or less, I would be fine. The first hint was in the sample preview for cell formating. Anytime I saw hash marks in the sample box, my text would not import.


Here is how I fixed it! Added a Custom "text" Type, and all the hash marks disappeared!

Friday, February 4, 2011
Cannot Build Data View Web Part Remotely
I was trying to build a Data View Table using SharePoint Designer 2007 remotely. I could create my Data Source and see all of my columns. However, when I clicked to view the Data Source Details, I received an error:
"The server returned a non-specific error when trying to get data from the data source. Check the format and content of your query and try again. If the problem persists, contact the server administrator."
After doing a little research, all I needed to do was modify the SqlDataSource SafeControlAssembly in the web.config file .
SafeControl Assembly="System.Web, Version=2.0.0.0, Culture=neutral, PublicKeyToken=b03f5f7f11d50a3a" Namespace="System.Web.UI.WebControls" TypeName="SqlDataSource" Safe="true" AllowRemoteDesigner="true"
I made the change, and now I can build my Data View Web Part from home, over the web, without a VPN!
Friday, January 28, 2011
Reading Excel in VB- Connection Strings and Registry Edits
A client had a request to upload a .xls file and place the data into a SQL table. At the time there was only the Microsoft Jet 4.0 engine in x86 (32bit). The connection string for VB is:


myconnection = New System.Data.OleDb.OleDbConnection("provider=Microsoft.Jet.OLEDB.4.0;data source=C:\filename.xls;Extended Properties=" + Chr(34) + "Excel 8.0;HDR=Yes;IMEX=1" + Chr(34) + ";")
The problem was that as the code ran through the rows, some of the values would be returned as null even though there was data in the cell. The reason this happens is that the reader is defaulted (in the registry), to look at the first 8 rows and determine the cell format. The way to get around this issue is to edit the registry values.
HKEY_LOCAL_MACHINE>>SOFTWARE>>Wow6432Node>>Microsoft>>Jet>>4.0>>Engines>>Excel
We want to make sure that when there is a "Mixed Type" of data imported, we want the data read as Text, and we want set TypeGuessRows to 0, meaning scan all rows before deciding the format of the data.

As time progressed, the client decided that in 2010, people should be able to upload .xlsx files as well. So I downloaded the appropriate 2007 Office System Driver Connectivity Components, which would only handle .xlsx files, not .xls files... No worries, my connection string turned into:
If LCase(Right(strFilePath, 3)) = "xls" Then
myconnection = New System.Data.OleDb.OleDbConnection("provider=Microsoft.Jet.OLEDB.4.0;data source=C:\filename.xls;Extended Properties=" + Chr(34) + "Excel 8.0;HDR=Yes;IMEX=1" + Chr(34) + ";")
End If
If LCase(Right(strFilePath, 4)) = "xlsx" Then
myconnection = New System.Data.OleDb.OleDbConnection("provider=Microsoft.ACE.OLEDB.12.0;data source=C:\filename.xls;Extended Properties=" + Chr(34) + "Excel 12.0;HDR=Yes;IMEX=1" + Chr(34) + ";")
End If
Pretty simple fix...
A couple of weeks later I read about the 2010 Office System Driver Connectivity Components, which will handle .xls and .xlsx files, and can be downloaded here. I uninstalled the 2007 package and installed the 2010, and went to update my connection string as per Microsoft's How to Use Instruction #2.
myconnection = New System.Data.OleDb.OleDbConnection("provider=Microsoft.ACE.OLEDB.12.0;data source=C:\filename.xls;Extended Properties=" + Chr(34) + "Excel 14.0;HDR=Yes;IMEX=1" + Chr(34) + ";")
This returned a "Could not find installable ISAM" error. After searching and reading, I discovered that the only modifications necessary were to remove the "If/Then" statements. My connection string now looked like:
myconnection = New System.Data.OleDb.OleDbConnection("provider=Microsoft.ACE.OLEDB.12.0;data source=C:\filename.xls;Extended Properties=" + Chr(34) + "Excel 12.0;HDR=Yes;IMEX=1" + Chr(34) + ";")
Everything ran well except now the .xls and .xlsx files were returning null values where cells had data. Time to run Regedit.
HKEY_LOCAL_MACHINE>>SOFTWARE>>Wow6432Node>>Microsoft>>Office>>14.0>>Access Connectivity Engine>>Engines>>Excel
And just like before, we want set TypeGuessRows to 0.

2 folders below the Engines folder is the ISAM folder. Take a look in there, and you will notice that the Excel 12.0 is for *.xlsb files, and that 12.0 Xml is for *.xlsx files. My final connection string looks like this:
Dim myconnection As System.Data.OleDb.OleDbConnection = New System.Data.OleDb.OleDbConnection("Provider=Microsoft.ACE.OLEDB.12.0; Data Source=C:\filename.xl; Extended Properties=" + Chr(34) + "Excel 12.0 Xml;HDR=YES;IMEX=1" + Chr(34) + ";")
It's the only one needed for reading both .xls and .xlsx files.
Wednesday, January 19, 2011
Create the STSADM Path Variable for Server 2008
In my last blog I talk about adding the STSADM command path as the first line of your scripts. However, you can just create a Variable Path that points to STSADM, and never worry about typing out it's location ever again from a command prompt. Here is how to add a path variable in Server 2008.
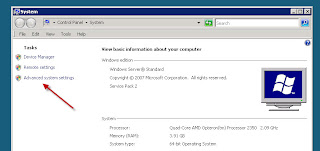
- Start menu --> right-click Computer --> Properties.
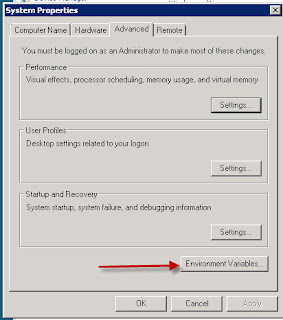
- From the Properties window, click Advanced system settings.
- Click Environment Variables.
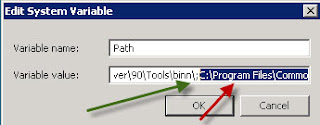
- Under System variables, scroll down and select the Path Variable --> Edit.
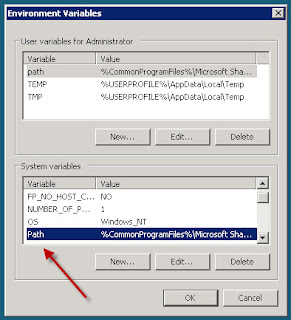
- Add a semi-colon (;) at the end of the last Variable value and paste in the path to STSADM:


Running STSADM Commands
I know that everyone and their mother has an opinion about how to deal with STSADM commands, so one more opinion won't hurt.
I suggest creating a folder on the C: drive called "Scripts", to store all of the batch (.bat) and command (.cmd) files that you create/run. It is a lot easier to edit the files in Notepad than it is to retype the whole STSADM command when you make a mistake. Also, if you blow up your farm, you have a record of all scripts run in case you have to rebuild.
The first thing to do when creating a script for SharePoint 2007 is to add the STSADM path as the first line:
cd C:\Program Files\Common Files\Microsoft Shared\web server extensions\12\BIN
Then write your STSADM command(s)
The last line of your script should be:
Pause
This will allow you to see the errors or successes without the cmd window closing.
Please remember to right-click the script and Run as Administrator.
Monday, January 17, 2011
Sync Active Directory to SQL
I have found that one of the most useful things to have sitting in a SQL database is User Information from Active Directory. The information can then be displayed using a data view web part. It's also useful for things like a custom content query web part that pulls information based on current user, or pull-down lists in InfoPath. The options really are endless.
Purpose
Our goal is to create a Timer Job that will take user information from Active Directory and put it into a system user table within SQL. We will only be getting some of the user information available within AD. You can download a couple of documents that have more information on different properties within AD. I do not remember where I downloaded these documents, I did not create them, but they were both very useful on a couple of projects: Get AD Documents
The one piece of information that is a wee bit tricky to get is the user's last logon date and time (lastLogon). The lastLogon property is stored on EACH domain controller for each user in AD, meaning that to get the correct last logon time we will have to get the information off each domain controller. Another interesting piece of information is that the lastLogon value is the "number of 100 nanosecond intervals since January 1, 1601 (UTC)."
I am running two domain controllers, so the examples are for getting the information back from 2 domain controllers.
The first thing we need to accomplish is to create a Linked Server, Server Object called ADSI.
Create the ADSI
Active Directory Services Interface (ADSI) allows us to talk to Active Directory.
Create the Temp Table
If you are going to bring back the lastLogon value, create a column for each of the Domain Controllers.

Create the System User Table

Create a Scalar-valued Function
As far as I know, there is not an easier way to compare values within a single row than creating a function to compare values for us. Once again, depending on how many domain controllers you have, will determine the number of columns to compare.

Get the Information
Depending on how many Domain Controllers you have, you will have to adjust your scripts to match your tables. Also, this script will only bring back 1,000 records at a time, due to a default paging setting in AD. You can either get the admin to change the setting (not a good idea) or create an additional filter to bring back the users in chunks. I would suggest filtering on the sAMAccountName, and bring back the users that have names that start with A-C, D-F,G-I,... you get the idea. So lets test...
Press F5 (Execute!)

Get Test SQL script here
This script should bring back all "Person(s)" and "User(s)" within the CN from AD. I have added a filter to remove anyone named 'Administrator' and 'Guest' as well. I added the homePage for the fun of it for the test, and will not be importing the information within the Stored Procedure.
Once we have all the information being returned, we can go ahead and create a stored procedure so that the timer job will have something to run!
Create the Stored Procedure
I prefer to use the drop/create method before populating the Temp Table, but feel free to use an update command to modify the existing information.
1) Create a New Stored Procedure.
2) Go to your Temp_ADUsers table (right click) --> Script Table as --> DROP And CREATE To --> New Query EditorWindow.
3) Copy Paste the script into the new stored procedure, remove the "Go" statements since you cannot use them in stored procedures.
4) Add the 1st AD script to insert the Users into the Temp_ADUsers table.
5) Add the 2nd AD script to insert the lastLogon from the second Domain Controller.
5) Add the script to update the current users, the ones that are already in the database.
6) Add the script that inserts new users into the database.
On the update, we have done a couple of things, such as change the userOrganization to a blank if NULL, and drop the email address if their account has been deactivated in AD. We do not want to send emails to people who are deactivated from the system... And we have done the math to figure out the lastLogon time.
On the insert, we will set their ReadOnly column, their System_Role, and do the math for lastLogon.
Create the Timer Job
There are several ways to create a timer job, this is the way that I do it...After we create the stored procedure, right click the procedure and select Script Stored Procedure as --> Execute To --> Agent Job...

Fill in your timer information... NOTE: This is only a temporary timer job...

Now we expand out SQL Server Agent, and Jobs, and look for our new timer job. Open up the properties of our new timer job, go to the Schedules Page, and modify the schedule:

Right click your new timer job and select Start Job at Step... and you should get a Success message or two!
You should now be able to synchronize Active Directory from 2 domain controllers into one SQL Table every 2 hours from 7am to 7pm.
Subscribe to:
Posts (Atom)