We do not have any "Content" deployment people at my office so I depend mostly on RSS feeds to keep the sites updated and changing on a constant basis.
One day, our IT department put in a Proxy Server, which killed all of the RSS feeds to SharePoint. I had to update the config file so that the RSS feeds were available once again.
I used the following sites as reference...
http://geekswithblogs.net/hinshelm/archive/2007/10/24/Proxy-server-settings-for-SharePoint-2007.aspx
http://microsoft-sharepoint-services.blogspot.com/2008/12/configuring-proxy-setting-on-sharepoint.html
http://support.microsoft.com/kb/912060
You will need to put the Proxy Setting into each Virtual Directory for every site that you want to be able to access the Internet.
The main reason that I am writing about these settings is that it took me too long to figure out that the last slash in the "proxyaddress" is REQUIRED...
In Server 2008, you will find the required files here...
C:\inetpub\wwwroot\wss\VirtualDirectories\YOUR SITE NAME\web.config
Add the following to the end of the .config file:
<system.net>
<defaultproxy>
<proxy usesystemdefault="false" proxyaddress="http://x.x.24.45:3128/" bypassonlocal="true" />
</defaultproxy>
</system.net>
Wednesday, April 21, 2010
Monday, April 19, 2010
Weather RSS Data View
The company that I work for travels people all over the word every week of the year. I thought that it would be nice to see what the weather will be so they can be better prepared for their job.
1) Create a Custom List within your SharePoint site, with columns Venue Name, Address, City, State, Zip, and Country.
2) Open up the site in SharePoint Designer.
3) Add a DataView Web Part to bring the Venue Address to the Web Site.
4) Open the Data Source Library
5) Create a Server-Side Script

6) Enter the URL information...
http://weather.msn.com/rss.aspx?wealocations=21076&weadegreetype=F
You can change the "21076" to your own default zip code.
The "add/modify paramiters" should have automatically filled in.
7) Drag the Data Source where you want it displayed on your web site.
8) Hover over the right edge of the Weather Script that you just added and select the Common Tasks button
a) Select Edit Columns
b) Remove all columns except for the description column
c) Select the Common xsl:value-of Tasks
d) Set the Data Field (description)
e) Set the Format as Rich Text (you will get a warning)
9) Go back to the Data View Web Part for the "Venue" that you created in Step 3 and hover over the right corner to select th eCommon Data View Tasks --> Web Part Connections
10) Click Add...

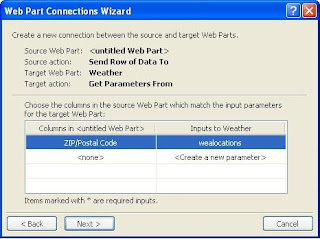
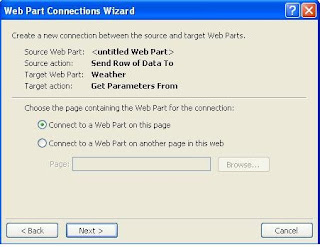
11) Click Next and then Finish...
Subscribe to:
Posts (Atom)