With the unveiling of the new Server 8 beta OS, and SQL 2012, I decided to see how I can upgrade my development farm.
Host:
Server 2008R2, 6 cores, 16 GB RAM.
Farm: All running Server 2008R2
OU-01: AD/DNS
SP-01: SharePoint 2010 SP1, August CU
SQL-01: SQL2008R2
I started by upgrading my Host OS via USB. This was not as much fun as I was hoping, but in the process, I did find a great utility for formatting USB drives made by HP (
http://download.cnet.com/HP-USB-Disk-Storage-Format-Tool/3000-2094_4-10974082.html). So you will need to download the ISO to USB tool from Microsoft called the
Windows 7 USB/DVD, you can download the tool
here... Run the program and follow the directions to create the boot-able USB.
So with the Host OS upgraded and my Snapshots taken, it was time to tackle my SP-01 box. I did not detach from the farm, or do anything special, I just attached the ISO and ran E:\
Setup.exe from the DVD.
With the installation completed, we are going to be looking at my 3 web applications, a Classic Authentication Application., a Claims based Authentication, and a Mysites Web Application, which is also a Classic Authentication Application type.
Now that we have the OS installed, and without even logging into the server, let's see what our sites look like.
Here is our Classic Authentication Site...
Here is our Claims Site (not a good sign)...
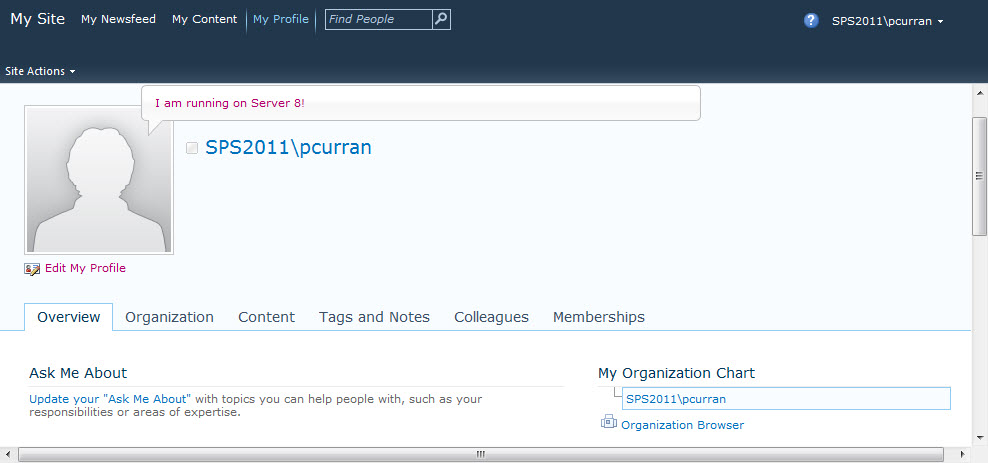
Here is our My Site...
|
This is a good sign!
|
This... not so much...
|
At this point I figured it is a Claims vs Classic authentication issue and a User Profile Issue. Let's look at CA and make sure that everything is running.
Logging into my Windows Server 8 box, I notice a lot of errors right off the bat...
So open up the event viewer to see what issues I am truly having...
Since all of our errors seem to stem from the STS having issues, lets take a look at our services and make sure that everything is up and running.
|
Service on Server
|
Web Applications
|
At this point, I decided that the STS will need to be provisioned again. But how to run PowerShell in Server 8?
Server 8 PowerShell (.Net 4.0) will not run the PowerShell v2.0 cmdlets. You will need to install a compiled PowerShell application like PowerGUI to run PowerShell v2.0 (.Net 3.5). Read step #6 in Craig Lussier blog post
Install SharePoint 2010 on Windows Server 8 Beta. You will want to download
PowerGUI.3.1.0.2058.msi to run your PowerShell commands. After downloading and installing, it will open a session of PowerGUI. Do not upgrade, and close the program. You will want to run PowerGUI as Administrator.
run the script...
Add-PSSnapin Microsoft.SharePoint.Powershell -EA 0
$sts = Get-SPServiceApplication | ?{$_ -match "Security"}
Write-Host($sts)
Write-Host($sts.Status)
$sts.provision()
lets verify sites...
Here is our Classic Authentication Site (still working)...
Here is our Claims Authentication Site...
Here is our My Site...


