1) Create the sample databases and data.

3) Next, we will open up SharePoint Designer 2007, and go to the top level of the site. For example, http://pc2007.local. We are now going to create a blank page based off the default,master page.
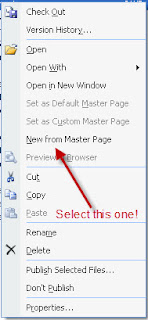
http://pc2007.local > _catalogs > masterpage > default.master. Right click the default.master and select "New from Master Page". This will open up a blank web page.


4) To incorporate out own ideas, we will need to go to the Common Content Tasks for PlaceHolderMain and select Create Custom Content.

6) I am going to label my columns and insert 2 Calendar Date Pickers.
 7) We now want to change the ids from "Calendar1" to "indate" and from "Calendar2" to "enddate"
 8) Within the Data Source Library tab, click "Connect to a database..."

9) Enter your SQL server information, click Next. And you will receive a warning about passwords being saved as plain text.
10) Select the database where your tables are stored, and we are going to select the Stored Procedure radial button.
 11) Click Finish! A new window should pop-up to Edit Custom SQL Commands.
12) Under the Select tab, select the Stored Procedure radial button (again) and select the appropriate stored procedure, and click the "OK" button.
13) Select the "General Tab" and give your database connection a useful name... and save it!
14) This is just my preference, but I will select the bottom left cell of my table to insert my source control...
 15) Hover your mouse over the newly created database connection and select "Insert Data Source Control" A Refresh Data Source Schema will pop-up, and you will want to click the "Ok" button.
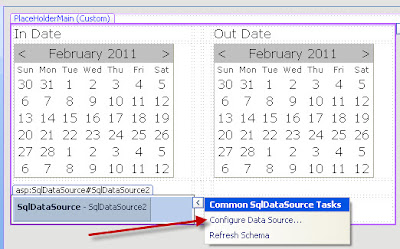
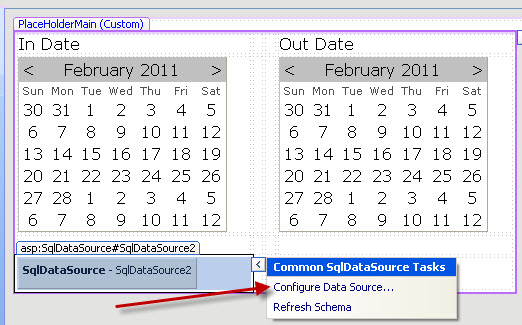
 16) You will want to open the Common SqlDataSource Tasks and select "Configure Data Source..."
 17) Click Next as we have already created the connection
18) However, we want to save the connection string locally, so give it a friendly name, and click Next.
 19) Verify the "Specify a custom SQL statement of stored procedure" radial button is selected, and click Next.
20) Under the Select tab, select the Stored Procedure radial button, find your Stored Procedure, and click Next.
 21) We now want to tell the connection what variables we want to pass to the Stored Procedure. Our sources are both "Control" types. However for the "enddate", make sure that your ControlID is the name of the control that has the End Date... We had named the calendar "enddate".
22) Set up the In Date control and press the Next button, and then the Finish button. You will get a warning about where the configuration for the connection is being saved.
 23) Merge the rows under the calendar.
 24) Under the Toolbox tab, we are going to expand the Data Section, grab the GridView control and drop it into the row under the calendar... The one where we just merged the cells...
 25) Open up the Common GridView Tasks and under the Choose Data Source, select your Data Source.
 26) Under the Common GridView Tasks, enable Paging and Enable Sorting.
 27) Save your work, check in your document, navigate to your new page, select an In and Out Date, and look at who is available!


9) Enter your SQL server information, click Next. And you will receive a warning about passwords being saved as plain text.
10) Select the database where your tables are stored, and we are going to select the Stored Procedure radial button.

12) Under the Select tab, select the Stored Procedure radial button (again) and select the appropriate stored procedure, and click the "OK" button.
13) Select the "General Tab" and give your database connection a useful name... and save it!
14) This is just my preference, but I will select the bottom left cell of my table to insert my source control...


18) However, we want to save the connection string locally, so give it a friendly name, and click Next.

20) Under the Select tab, select the Stored Procedure radial button, find your Stored Procedure, and click Next.

22) Set up the In Date control and press the Next button, and then the Finish button. You will get a warning about where the configuration for the connection is being saved.


