Tuesday, May 29, 2012

Verify Your SQL Connection / Get Connection String

I have been very fortunate to have some fantastic mentors.  One of them is a gentleman by the name of Ken Ammann, who taught me this trick when you need to verify your SQL connection or get your connection string.
1) From your desktop, right-click and create a new text document.

2) Change the file extension from .txt to .udl


becomes:

3) Click Yes to verify the change of extension type.

4) Open the UDL file and set properties.

5) Test the connection.

6) Click OK.
7) Change file extension back to .txt
8) Take a look at your connection string.
It is a nice easy way to verify your SQL connections when you need to verify that you still have a SQL connection.  The real reason that I wrote this post is that I was spending too much time trying to recall the UDL extension name.

Sunday, March 18, 2012

Upgrade to Server 8 (beta) With SharePoint 2010

With the unveiling of the new Server 8 beta OS, and SQL 2012, I decided to see how I can upgrade my development farm.
Host:
Server 2008R2, 6 cores, 16 GB RAM.
Farm: All running Server 2008R2
OU-01: AD/DNS
SP-01: SharePoint 2010 SP1, August CU
SQL-01: SQL2008R2

I started by upgrading my Host OS via USB.  This was not as much fun as I was hoping, but in the process, I did find a great utility for formatting USB drives made by HP (http://download.cnet.com/HP-USB-Disk-Storage-Format-Tool/3000-2094_4-10974082.html).  So you will need to download the ISO to USB tool from Microsoft called the Windows 7 USB/DVD, you can download the tool here...  Run the program and follow the directions to create the boot-able USB.

So with the Host OS upgraded and my Snapshots taken, it was time to tackle my SP-01 box.  I did not detach from the farm, or do anything special, I just attached the ISO and ran E:\Setup.exe from the DVD.


With the installation completed, we are going to be looking at my 3 web applications,  a Classic Authentication Application., a Claims based Authentication, and a Mysites Web Application, which is also a Classic Authentication Application type.
Now that we have the OS installed, and without even logging into the server, let's see what our sites look like.
Here is our Classic Authentication Site...
Here is our Claims Site (not a good sign)...
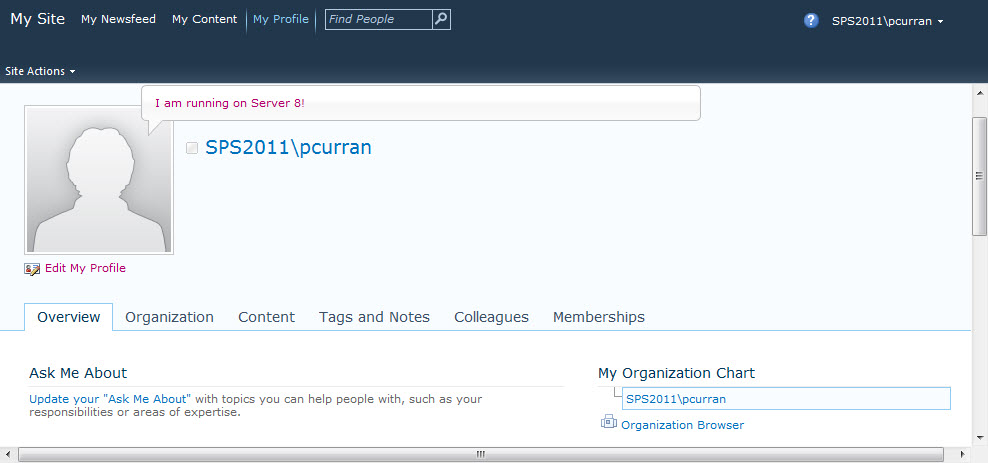
Here is our My Site... 
This is a good sign!
This... not so much...
At this point I figured it is a Claims vs Classic authentication issue and a User Profile Issue.  Let's look at CA and make sure that everything is running.
Logging into my Windows Server 8 box, I notice a lot of errors right off the bat...
So open up the event viewer to see what issues I am truly having...

Since all of our errors seem to stem from the STS having issues, lets take a look at our services and make sure that everything is up and running.
Service on Server
Web Applications

At this point, I decided that the STS will need to be provisioned again.  But how to run PowerShell in Server 8?
Server 8 PowerShell (.Net 4.0) will not run the PowerShell v2.0 cmdlets.  You will need to install a compiled PowerShell application like PowerGUI to run PowerShell v2.0 (.Net 3.5).  Read step #6 in Craig Lussier blog post Install SharePoint 2010 on Windows Server 8 Beta.  You will want to download PowerGUI.3.1.0.2058.msi to run your PowerShell commands.  After downloading and installing, it will open a session of PowerGUI.  Do not upgrade, and close the program.  You will want to run PowerGUI as Administrator.
run the script...
Add-PSSnapin Microsoft.SharePoint.Powershell -EA 0
$sts = Get-SPServiceApplication | ?{$_ -match "Security"}
Write-Host($sts)
Write-Host($sts.Status)
$sts.provision()
lets verify sites...
Here is our Classic Authentication Site (still working)...
Here is our Claims Authentication Site... 
Here is our My Site...


Tuesday, March 6, 2012

Restore SQL DBs Using PowerShell

Of course the next logical thing after getting your backup script working is to create your restore script...  I used Donabel Santos's script from http://www.sswug.org/articles/viewarticle.aspx?id=44909 as a reference.
$restoreDir = "c:\shared\Temp\" # last slash very important!

if ((test-path $restoreDir) -eq $false ) # Verify folder exists
  {
     $a = Read-Host("Path Not Found!")
     Exit -1 
  }

[System.Reflection.Assembly]::LoadWithPartialName("Microsoft.SqlServer.SMO") | out-null
[System.Reflection.Assembly]::LoadWithPartialName("Microsoft.SqlServer.SmoExtended") | out-null
[Reflection.Assembly]::LoadWithPartialName("Microsoft.SqlServer.ConnectionInfo") | Out-Null
[Reflection.Assembly]::LoadWithPartialName("Microsoft.SqlServer.SmoEnum") | Out-Null

$files = get-childitem $restoreDir -recurse
foreach ($file in $files)
  {
    $backupFile = $restoreDir + $file
    $server = New-Object ("Microsoft.SqlServer.Management.Smo.Server") "(local)"
    $backupDevice = New-Object ("Microsoft.SqlServer.Management.Smo.BackupDeviceItem") ($backupFile, "File")
    $dbRestore = new-object("Microsoft.SqlServer.Management.Smo.Restore")
    $dbRestore.NoRecovery = $false;
    $dbRestore.ReplaceDatabase = $true;
    $dbRestore.Action = "Database"
    $dbRestore.Devices.Add($backupDevice)
    $dbRestoreDetails = $dbRestore.ReadBackupHeader($server)
    "Restoring Database: " + $dbRestoreDetails.Rows[0]["DatabaseName"]
    $dbRestore.Database = $dbRestoreDetails.Rows[0]["DatabaseName"]
    $dbRestore.SqlRestore($server)
  }

Friday, March 2, 2012

Get First and Last Day of Current Month in SQL

I have been spending most of the last couple of day hammering out reports in SSRS.  I needed to get information for the current month, but needed to know the first and last dates to set my query.  I do not want to run into any kind of Azure Date issues (http://www.wired.com/wiredenterprise/2012/03/azure-leap-year-bug/)
declare @reportDate datetime 
declare @lastDate datetime 
set @reportDate = GETDATE() 
Set @reportDate = DateAdd(Day, 1, @reportDate - Day(@reportDate) + 1) -1 
Set @lastDate = DateAdd(Month, 1, @reportDate - Day(@reportDate) + 1) -1 
select @reportDate, @lastDate

 Update (05/01/2012):
I was not very happy with the above query, so I have updated it...  I have also added the functionality to set the time back to midnight...
declare @first datetime
declare @last datetime
set @first = dateadd(day, 1, getdate() - day(getdate()))
set @last = dateadd(day, -1, dateadd(month, 1, @first))
select @first, @last
set @first = DATEADD(dd, DATEDIFF(dd, 0, @first), 0)
set @last = DATEADD(dd, DATEDIFF(dd, 0, @last), 0)
select @first, @last

Thursday, February 16, 2012

Backing Up SQL DBs Using PowerShell

My next project requires that I create several SQL Mirrors, and instead of backing up my databases with SQL, I thought I would try it in PowerShell.  The majority of the script is from Edwin Sarmiento's blog http://www.mssqltips.com/sqlservertip/1862/backup-sql-server-databases-with-a-windows-powershell-script/  (Excellent Post)
$bkdir = "\\serverName\Shared\Temp" # Set Backup Path! (optional "C:\Temp")

if ((test-path $bkdir) -eq $false ) # Verify folder else create it...
  {
     [IO.Directory]::CreateDirectory($bkdir) 
  }

[System.Reflection.Assembly]::LoadWithPartialName("Microsoft.SqlServer.SMO") | out-null
[System.Reflection.Assembly]::LoadWithPartialName("Microsoft.SqlServer.SmoExtended") | out-null
$s = new-object ("Microsoft.SqlServer.Management.Smo.Server") $instance

$dbs = $s.Databases
foreach ($db in $dbs) 
  {
     if(($db.Name -ne "tempdb") -and ($db.Name -ne "master") -and ($db.Name -ne "model") -and ($db.Name -ne "msdb")) 
          {
               $dbname = $db.Name
               $dbBackup = new-object ("Microsoft.SqlServer.Management.Smo.Backup")
               $dbBackup.Action = "Database"
               $dbBackup.Database = $dbname
               $dbBackup.Devices.AddDevice($bkdir + "\" + $dbname + ".bak", "File")
               $dbBackup.SqlBackup($s)
               write-host($db.name + " has been backed up.")
          }
  }
If you are saving to a network location, the SQL SA account and the person running the script need to have read/write permissions to the location.

Update: (03/05/2012)
Added save location verification else create folder.

Monday, January 16, 2012

Get The DBO From All SQL Databases

I have finally decided to start keeping track of the useful SQL commands that I have used.  Mostly because I am tired of rewriting them.  Also, if I have had to use them, then I sure that someone else (or me again) might find them useful.
While moving databases around within SQL to optimize IOPS and/or drive utilization, you might have a need to put the Database Owner back to what it was originally. Before you drop your databases, take a look at the DBO first.
This will grab all the dbo's of all the databases on your server:
select SUSER_SNAME(owner_sid) as username, name from sys.databases
Now, if you want to change the DBO...
sp_changeDbOwner @loginame = 'domain\username'
However, you might run into an error is the DBO is already a user or aliased in the database.
To fix this problem, run the following:
USE <databaseName>
GO
SP_DROPUSER 'domain\username'
GO
SP_CHANGEDBOWNER 'domain\username'
UPDATE 02/04/2015
Added drop user and change owner code.

Tuesday, January 10, 2012

Add SharePoint Snap-In to PowerShell ISE

Let me start off with saying that I, in no way, came up with this solution.  It was first shown to me by Shannon Bray (http://shannonbray.wordpress.com) when he and Gary Lapointe were maintaining spPowerShell.com.
Since the site is no longer available, I have had to grab the following information from Kirk Evens (Add Microsoft.SharePoint.PowerShell Snap-In to All PowerShell Windows) and from Spence Harbar (Adding SharePoint 2010 PoweShell cmdlets to your PowerShell ISE).

Open up Windows PowerShell ISE (Run as Administrator), and run the following script:

# set the execution policy to run scripts
set-executionpolicy unrestricted -force

# Create the profile
if (!(test-path $profile.AllUsersAllHosts)) {new-item -type file -path $profile.AllUsersAllHosts –force}
psEdit $profile.AllUsersAllHosts
In the new Tab,
For SharePoint 2010 add the following:
cd 'C:\Program Files\Common Files\Microsoft Shared\Web Server Extensions\14\CONFIG\POWERSHELL\Registration'
.\SharePoint.ps1
cd \ 
For SharePoint 2013 add the following:
cd 'C:\Program Files\Common Files\Microsoft Shared\Web Server Extensions\15\CONFIG\POWERSHELL\Registration'
.\SharePoint.ps1
cd \ 
Save the Profile tab (no, you do not run the script)

Again, thanks to Shannon, Kirk, Gary, and Spence for their posts!

UPDATE (01/16/2012)
After speaking with Shannon, he has finally moved over the blog...  you can find his ISE blog here...
http://shannonbray.wordpress.com/2010/06/23/sharepoint-and-powershell-ise/
UPDATE (10/21/2012)
Added the section for SharePoint 2013...