Monday, March 28, 2011

Deploy and Retract .wsp Files using STSADM or PowerShell

As recommended in previous posts on using STSADM; I suggest creating a .cmd file to run the scripts, and save the scripts in a folder.  I am also assuming that you have STSADM added to your variable path.  Don't forget to right click, and run as Administrator!

Deploy with STSADM:
stsadm -o addsolution -filename path\solutionName.wsp
stsadm -o deploysolution -name solutionName.wsp -immediate -allowgacdeployment -force -allcontenturls
stsadm -o execadmsvcjobs
pause
iisreset /noforce

Retract with STSADM:
stsadm -o retractsolution -name solutionName.wsp -immediate -allcontenturls
stsadm -o execadmsvcjobs
pause
stsadm -o deletesolution -name solutionName.wsp -override
pause
iisreset /noforce

Remember, to run the following commands you must have SPShellAdmin permissions (see Add-SPShellAdmin)

Add, Install, Enable, Update, Disable, Uninstall, and Remove Farm or User Solutions (SPUserSolution) with PowerShell:
1) Update lines 1-4 (and line 6 if working with sandboxed solutions).
2) Remove the pound(#) symbol of the command you want to run.

$fileLocation = "C:\Projects\Event Receiver\bin\Debug"
$wspFileName = "Event_Receiver.wsp"
$featureIdentity = "Event Receiver_Feature1"
$url = "http://pc2010.local/"
# Sandboxed Solution Upgrade Name
$toSolutionName = "Event_Receiver_v2.wsp"

Add-PSSnapin Microsoft.SharePoint.PowerShell -EA 0
$literalPath = $fileLocation + "\" + $wspFileName
Write-Host("Using WSP from: " + $literalPath)

<#
    *****************************
    *       Farm Solutions      *
    *****************************
#>

# Add WSP Solution (http://technet.microsoft.com/en-us/library/ff607552.aspx)
# Write-Host("Adding solution to Farm..."); Add-SPSolution -literalpath $literalPath

# Update Existing WSP Solution (http://technet.microsoft.com/en-us/library/ff607724.aspx)
# Write-Host("Updating solution in Farm..."); Update-SPSolution -identity $wspFileName -literalpath $literalPath -gacdeployment

# Deploy WSP solution to the Farm (http://technet.microsoft.com/en-us/library/ff607534.aspx)
# Write-Host("Deploying solution to the Farm..."); Install-SPSolution -identity $wspFileName -allwebapplications -gacdeployment -force

# Enable an installed feature at the given scope (http://technet.microsoft.com/en-us/library/ff607803.aspx)
# If the feature is a farm feature, no URL is needed
# Write-Host("Enabling Feature..."); Enable-SPFeature -identity $featureIdentity -url $url

# Disable a feature at the given scope (http://technet.microsoft.com/en-us/library/ff607879.aspx)
# If the feature is a farm feature, comment out -URL Parameter
# Write-Host("Disabling Feature..."); Disable-SPFeature -identity $featureIdentity -force -confirm:$false -url $url

# Retract WSP solution from the farm (http://technet.microsoft.com/en-us/library/ff607873.aspx)
# Write-Host("Retracting Solution from Farm..."); Uninstall-SPSolution -identity $wspFileName -confirm:$false

# Delete WSP solution from the farm (http://technet.microsoft.com/en-us/library/ff607748.aspx)
# Write-Host("Deleting solution from Farm..."); Remove-SPSolution -identity $wspFileName -force -confirm:$false

<#
    *****************************
    *       User Solutions      *
    *****************************
#>

# Add sandboxed solution to solution gallery (http://technet.microsoft.com/en-us/library/ff607715.aspx)
# Write-Host("Adding user solution to solution gallery..."); Add-SPUserSolution -LiteralPath $literalPath -Site $url

# Activate the sandboxed solution in a site collection (http://technet.microsoft.com/en-us/library/ff607653.aspx)
# Write-Host("Enabeling sandboxed solution..."); Install-SPUserSolution -identity $wspFileName -Site $url

# Upgrade EXISTING activated sandboxed solution (http://technet.microsoft.com/en-us/library/ff607902.aspx)
# Write-Host("Updating sandboxed solution..."); Update-SPUserSolution -identity $wspFileName -Site $url -ToSolution $toSolutionName

# Deactivate a sandboxed solution from site collection (http://technet.microsoft.com/en-us/library/ff607582.aspx)
# Write-Host("Retracting sandboxed solution..."); Uninstall-SPUserSolution -identity $wspFileName -Site $url -confirm:$false

# Delete a sandboxed solution from site collection (http://technet.microsoft.com/en-us/library/ff607709.aspx)
# Write-Host("Deleting sandboxed solution..."); Remove-SPUserSolution -identity $wspFileName -Site $url -confirm:$false
Update (11/2/2014)
Finally added the ability to Add, Enable, Update, Deactivate, and Remove Sandboxed Solutions (SPUserSolutions).
Added write-host output so that you know what you did...
Update (01/26/2015)
Added a closing parenthesis ")" for installing solution, and fixed some spelling errors

Thursday, March 24, 2011

RSS Feeds from Google News

Sometimes the news sources you are trying to collect do not have good RSS feeds.  Especially if you are trying to collect information about a very niche subject.  Google has made it very easy to collect news to display as an RSS feed within SharePoint.
1)  Go to http://news.google.com
2)  Type in your search parameters
3)  Modify the results URL by adding "&output=rss" at the end of the URL, and go to the new URL
4)  Verify that you are indeed getting the feed.

4)  Add the RSS Viewer webpart to your page
5)  Under RSS Properties, in the RSS Feed URL, add the modified URL.

Thursday, March 17, 2011

Increase Time Before Connection Timeout Between SQL and SharePoint

I have run into an issue with a couple of clients where a Connection Timeout Error occurs on either very large SSRS reports or in some custom web parts pulling data from SQL.   By default, the connection between SharePoint and your SQL servers will timeout after 120 seconds.  My current client just had me create a report that takes about 8.5 minutes to complete rendering...  oops, error!
This is how you fix the timeout issue:
1)  Go to the virtual directory for the site that is timing out.
         C:\inetpub\wwwroot\wss\VirtualDirectories\yourSite
2)  Make a backup of the web.config file.
3)  Edit the web.config file and add an httpRuntime property called "executionTimeout"

In the example below, my connection will now timeout after 5 minutes (300 seconds).

Tuesday, March 1, 2011

Create a Data Grid View Using SPD 2007 and a SQL Stored Procedure

Let's say that we have a SQL table of Resources (people), and in another SQL table we have their schedules.  How can we view a list of people who are available to work certain dates?  Basically, we want the user to enter a "Start Date" and an "End Date" and retrieve a Data Grid list of all people in the company who are available to work within those dates.
1) Create the sample databases and data.

2) Create the Stored Procedure
Get Stored Procedure script here

3) Next, we will open up SharePoint Designer 2007, and go to the top level of the site.  For example, http://pc2007.local.  We are now going to create a blank page based off the default,master page.
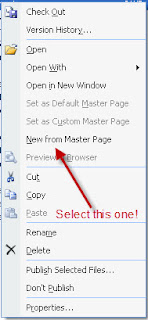
http://pc2007.local  > _catalogs > masterpage > default.master.  Right click the default.master and select "New from Master Page".  This will open up a blank web page.
 
4) To incorporate out own ideas, we will need to go to the Common Content Tasks for PlaceHolderMain and select Create Custom Content.
5) Within the PlaceHolderMain, I am going to add a 4x4 table.  Table > Insert Table 

6) I am going to label my columns and insert 2 Calendar Date Pickers.
7) We now want to change the ids from "Calendar1" to "indate" and from "Calendar2" to "enddate"
8) Within the Data Source Library tab, click "Connect to a database..."

9) Enter your SQL server information, click Next.  And you will receive a warning about passwords being saved as plain text.

10) Select the database where your tables are stored, and we are going to select the Stored Procedure radial button.
11) Click Finish!  A new window should pop-up to Edit Custom SQL Commands.

12) Under the Select tab, select the Stored Procedure radial button (again) and select the appropriate stored procedure, and click the "OK" button.

13) Select the "General Tab" and give your database connection a useful name... and save it!

14) This is just my preference, but I will select the bottom left cell of my table to insert my source control...
15) Hover your mouse over the newly created database connection and select "Insert Data Source Control"  A Refresh Data Source Schema will pop-up, and you will want to click the "Ok" button.
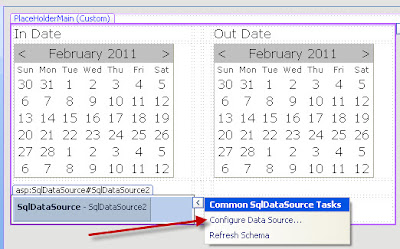
16) You will want to open the Common SqlDataSource Tasks and select "Configure Data Source..."
17) Click Next as we have already created the connection

18) However, we want to save the connection string locally, so give it a friendly name, and click Next.
19) Verify the "Specify a custom SQL statement of stored procedure" radial button is selected, and click Next.

20)  Under the Select tab, select the Stored Procedure radial button, find your Stored Procedure, and click Next.
21)  We now want to tell the connection what variables we want to pass to the Stored Procedure.  Our sources are both "Control" types.  However for the "enddate", make sure that your ControlID is the name of the control that has the End Date...  We had named the calendar "enddate".

22)  Set up the In Date control and press the Next button, and then the Finish button.  You will get a warning about where the configuration for the connection is being saved.
23)  Merge the rows under the calendar.
24) Under the Toolbox tab, we are going to expand the Data Section, grab the GridView control and drop it into the row under the calendar...  The one where we just merged the cells...
25) Open up the Common GridView Tasks and under the Choose Data Source, select your Data Source.
26)  Under the Common GridView Tasks, enable Paging and Enable Sorting.
27)  Save your work, check in your document, navigate to your new page, select an In and Out Date, and look at who is available!